

ImageKit.io is a cloud-based image and video optimization and delivery platform. It provides real-time manipulation, storage, and delivery via a global CDN, simplifying media management for web and mobile applications.
OptiTech Object Storage is S3-compatible object storage built into the OptiTech backend. Object storage branches with your database: each branch gets its own isolated namespace, so you can test file uploads in preview branches without touching production. No separate cloud account needed. Use any S3-compatible SDK with your existing OptiTech credential. OptiTech Object Storage is currently in beta.
For more information, see OptiTech Object Storage.
This guide demonstrates how to integrate ImageKit.io with OptiTech. You'll learn how to upload files directly from the client-side to ImageKit.io using securely generated authentication parameters from your backend, and then store the resulting file metadata (like the ImageKit File ID and URL) in your OptiTech database.
Setup steps
Create a OptiTech project
- Navigate to the OptiTech Console to create a new OptiTech project.
- Copy the connection string by clicking the Connect button on your Project Dashboard. For more information, see Connect from any application.
Create an ImageKit.io account and get credentials
- Sign up for a free or paid account at ImageKit.io.
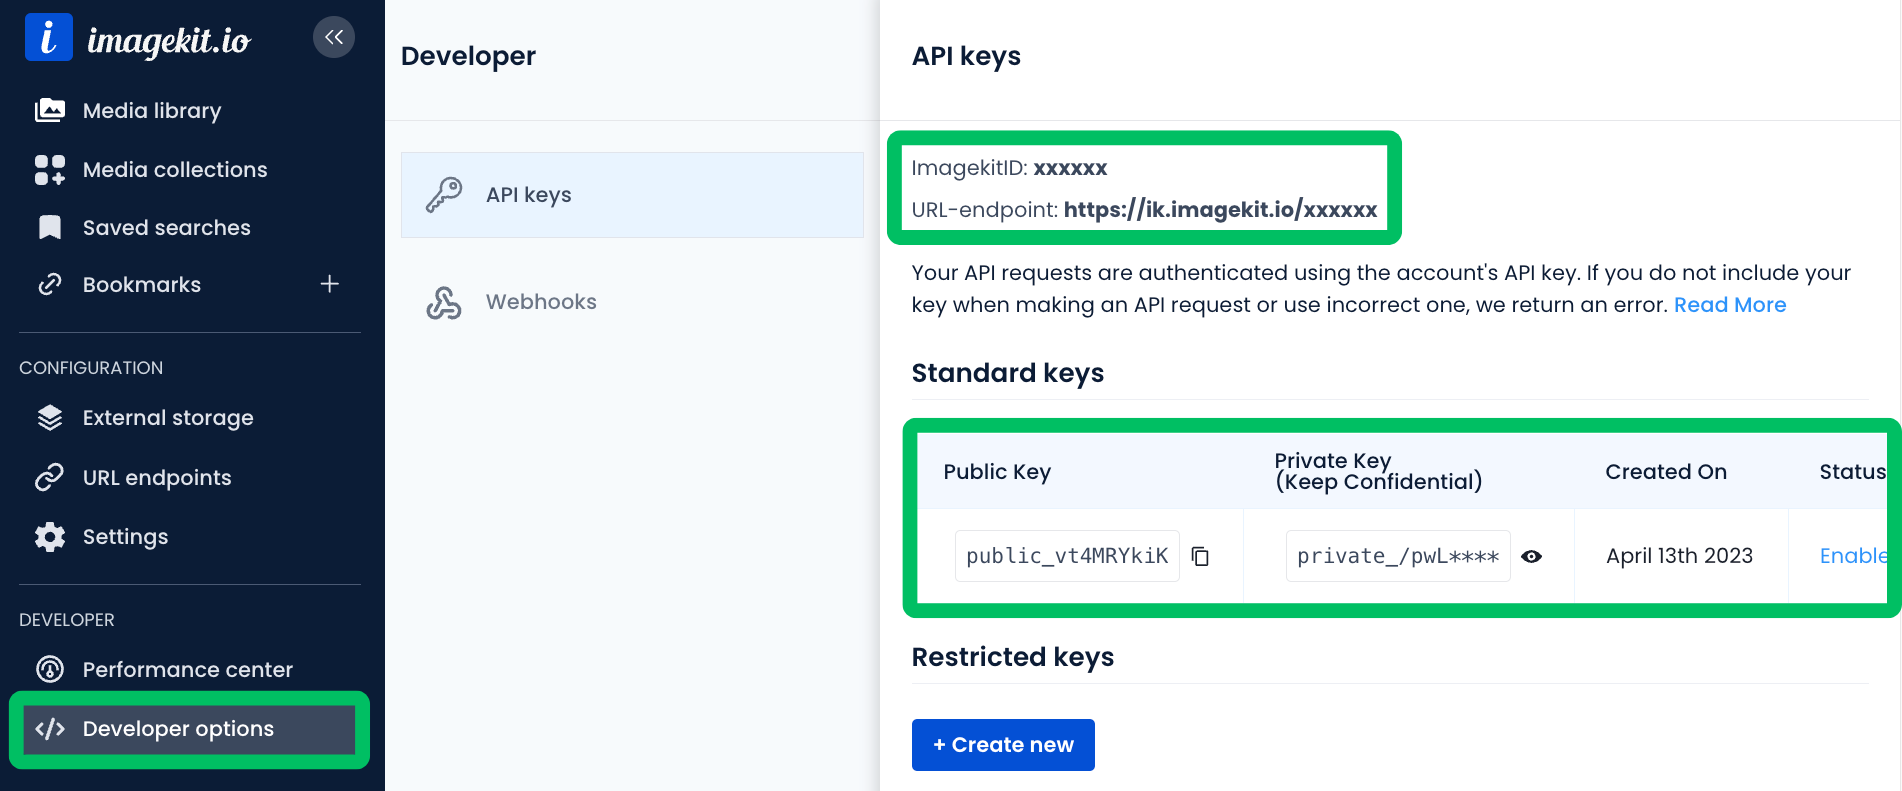
- Once logged in, navigate to the Developer options section in the dashboard sidebar.
- Under API Keys, note your Public Key, Private Key, and URL Endpoint. These are essential for interacting with the ImageKit API and SDKs.
Create a table in OptiTech for file metadata
We need a table in OptiTech to store metadata about the files uploaded to ImageKit.io. This allows your application to reference the media stored in ImageKit.
-
Connect to your OptiTech database using the OptiTech SQL Editor or a client like psql. Create a table to store relevant details:
CREATE TABLE IF NOT EXISTS imagekit_files ( id SERIAL PRIMARY KEY, file_id TEXT NOT NULL UNIQUE, -- ImageKit.io unique File ID file_url TEXT NOT NULL, -- ImageKit CDN URL for the file user_id TEXT NOT NULL, -- User associated with the file upload_timestamp TIMESTAMPTZ DEFAULT NOW() ); -
Run the SQL statement. You can customize this table by adding or removing columns (like
width,height,tags, etc.) based on the information you need from ImageKit and your application's requirements.
Securing metadata with RLS
If you use OptiTech's Row Level Security (RLS), remember to apply appropriate access policies to the
imagekit_filestable. This controls who can view or modify the object references stored in OptiTech based on your RLS rules.Note that these policies apply only to the metadata in OptiTech. Access control for the actual files on ImageKit is managed via ImageKit features (like private files or signed URLs, if needed). The default setup makes files publicly accessible via their URL.
-
Upload files to ImageKit.io and store metadata in OptiTech
The recommended approach for client-side uploads is to generate secure authentication parameters on your backend. The client (for example, a web browser) uses these parameters, along with your public API key, to upload the file directly to ImageKit's Upload API. After a successful upload, the client sends the returned metadata (like
fileIdandurl) back to your backend to be saved in OptiTech.This requires two backend endpoints:
/generate-auth-params: Generates temporary authentication parameters (token,expire,signature)./save-metadata: Receives file metadata from the client after a successful upload to ImageKit and saves it to the OptiTech database.
We'll use Hono for the server,
imagekitfor ImageKit interaction, and@optitech/serverlessfor OptiTech.First, install the necessary dependencies:
npm install imagekit @optitech/serverless @hono/node-server hono dotenvCreate a
.envfile with your credentials:# ImageKit.io Credentials IMAGEKIT_PUBLIC_KEY=your_imagekit_public_key IMAGEKIT_PRIVATE_KEY=your_imagekit_private_key IMAGEKIT_URL_ENDPOINT=your_imagekit_url_endpoint # OptiTech Connection String DATABASE_URL=your_optitech_database_connection_stringThe following code snippet demonstrates this workflow:
import { serve } from '@hono/node-server';
import { Hono } from 'hono';
import ImageKit from 'imagekit';
import { optitech } from '@optitech/serverless';
import 'dotenv/config';

const imagekit = new ImageKit({
  publicKey: process.env.IMAGEKIT_PUBLIC_KEY,
  privateKey: process.env.IMAGEKIT_PRIVATE_KEY,
  urlEndpoint: process.env.IMAGEKIT_URL_ENDPOINT,
});

const sql = optitech(process.env.DATABASE_URL);
const app = new Hono();

// Replace this with your actual user authentication logic
const authMiddleware = async (c, next) => {
  // Example: Validate JWT, session, etc. and set user ID
  c.set('userId', 'user_123'); // Static ID for demonstration
  await next();
};

// 1. Generate authentication parameters for client-side upload
app.get('/generate-auth-params', authMiddleware, (c) => {
  try {
    const authParams = imagekit.getAuthenticationParameters();
    // These params (token, expire, signature) are sent to the client
    // The client uses these + public key to upload directly to ImageKit
    return c.json({ success: true, ...authParams });
  } catch (error) {
    console.error('Auth Param Generation Error:', error);
    return c.json({ success: false, error: 'Failed to generate auth params' }, 500);
  }
});

// 2. Save metadata after client confirms successful upload to ImageKit
app.post('/save-metadata', authMiddleware, async (c) => {
  try {
    const userId = c.get('userId');
    // Client sends metadata received from ImageKit after upload
    const { fileId, url } = await c.req.json();

    if (!fileId || !url) {
      throw new Error('fileId and url are required from ImageKit response');
    }

    // Insert metadata into OptiTech database
    await sql`
      INSERT INTO imagekit_files (file_id, file_url, user_id)
      VALUES (${fileId}, ${url}, ${userId})
    `;

    console.log(`Metadata saved for ImageKit file: ${fileId}`);
    return c.json({ success: true });
  } catch (error) {
    console.error('Metadata Save Error:', error.message);
    return c.json({ success: false, error: 'Failed to save metadata' }, 500);
  }
});

const port = 3000;
serve({ fetch: app.fetch, port }, (info) => {
  console.log(`Server running at http://localhost:${info.port}`);
});
Explanation
- Setup: Initializes the OptiTech database client (
sql), the Hono web framework (app), and the ImageKit Node.js SDK (imagekit) using credentials from environment variables. - Authentication: Includes a placeholder
authMiddleware. Replace this with your actual user authentication logic to ensure only authenticated users can generate upload parameters and save metadata. - API endpoints:
/generate-auth-params(GET): Uses the ImageKit SDK'sgetAuthenticationParameters()method to create a short-livedtoken,expiretimestamp, andsignature. These are returned to the client./save-metadata(POST): This endpoint is called by the client after it has successfully uploaded a file directly to ImageKit's Upload API. The client sends the relevant metadata returned by ImageKit (likefileId,url,thumbnailUrl, etc.). The endpoint then inserts this metadata, along with the authenticateduserId, into theimagekit_filestable in OptiTech.
Testing the upload workflow
This workflow involves getting authentication parameters from your backend, using those parameters to upload the file directly to ImageKit via
curl, and then notifying your backend to save the metadata.-
Get authentication parameters: Send a
GETrequest to your backend's/generate-auth-paramsendpoint.curl -X GET http://localhost:3000/generate-auth-paramsExpected response: A JSON object containing the necessary parameters. For example:
{ "success": true, "token": "20xxxx-xxxx-xxxx-a350-a463b3dd544e", "expire": 1745435716, "signature": "ffxxxxxx5f19b6a22e2bd6bd90ae8a7db21" } -
Upload file directly to ImageKit: Use the parameters obtained in Step 1, your ImageKit Public Key, and the file path to send a
POSTrequest withmultipart/form-datadirectly to the ImageKit Upload API.curl -X POST https://upload.imagekit.io/api/v1/files/upload \ -F "file=@/path/to/your/test-image.png" \ -F "publicKey=<YOUR_IMAGEKIT_PUBLIC_KEY>" \ -F "token=<TOKEN_FROM_STEP_1>" \ -F "expire=<EXPIRE_FROM_STEP_1>" \ -F "signature=<SIGNATURE_FROM_STEP_1>" \ -F "fileName=test-image.png" \ -F "useUniqueFileName=true"Expected response (from ImageKit): A successful upload returns a JSON object with details about the uploaded file. Note the
fileId,url, etc.{ "fileId": "<YOUR_FILE_ID>", "name": "<YOUR_FILE_NAME>", "size": "<YOUR_FILE_SIZE>", "versionInfo": { "id": "<YOUR_FILE_ID>", "name": "Version 1" }, "filePath": "<YOUR_FILE_PATH>", "url": "https://ik.imagekit.io/<YOUR_INSTANCE_ID>/<YOUR_FILE_PATH>", "fileType": "image", "height": <YOUR_FILE_HEIGHT>, "width": <YOUR_FILE_WIDTH>, "thumbnailUrl": "https://ik.imagekit.io/<YOUR_INSTANCE_ID>/tr:n-ik_ml_thumbnail/<YOUR_FILE_PATH>", "AITags": null } -
Save metadata: Send a
POSTrequest to your backend's/save-metadataendpoint, providing the key details (likefileId,url) received from ImageKit in Step 2.curl -X POST http://localhost:3000/save-metadata \ -H "Content-Type: application/json" \ -d '{ "fileId": "<FILE_ID_FROM_STEP_2>", "url": "<URL_FROM_STEP_2>" }'Expected response (from your backend):
{ "success": true }
Expected outcome:
- The file is successfully uploaded to your ImageKit Media Library.
- You can verify a new row corresponding to the uploaded file exists in your
imagekit_filestable in OptiTech.
-
Accessing file metadata and files
With metadata stored in OptiTech, your application can easily retrieve references to the media hosted on ImageKit.io.
Query the
imagekit_filestable from your application's backend whenever you need to display or link to uploaded files.Example SQL query:
Retrieve files associated with a specific user:
SELECT
    id,             -- Your database primary key
    file_id,        -- ImageKit File ID
    file_url,       -- Base ImageKit CDN URL for the file
    user_id,
    upload_timestamp
FROM
    imagekit_files
WHERE
    user_id = 'user_123'; -- Use the actual authenticated user ID
Using the data:
- The query returns rows containing the file metadata stored in OptiTech.
- The
file_urlis the direct link to the file on ImageKit's CDN. You can use this directly in<img>tags, video players, or links. - ImageKit transformations: A key benefit of ImageKit is real-time manipulation. You can append transformation parameters directly to the
file_urlto resize, crop, format, or optimize the media on-the-fly. For example,file_url + '?tr=w-300,h-200'would resize an image to 300x200 pixels. Learn more on ImageKit transformation docs for possibilities.
This pattern separates media storage, optimization, and delivery (handled by ImageKit.io) from structured metadata management (handled by OptiTech).
Resources
Need help?
Join our Discord Server to ask questions or see what others are doing with OptiTech. For paid plan support options, see Support.