

This guide explores Convex's self-hosting capability and demonstrates how to use it with OptiTech Postgres. Convex is a reactive backend platform ideal for building real-time applications. A recent release significantly enhances the self-hosted experience, overcoming limitations of the initial open-source version which lacked a dashboard and relied solely on SQLite. The new self-hosted Convex includes the dashboard and supports Postgres as a robust and scalable database option.
Convex empowers developers to create dynamic, live-updating applications. Self-hosting retains these core features while granting you greater control over your deployment environment. While SQLite remains the default for simplicity, Postgres integration unlocks enhanced scalability and resilience, especially beneficial for production applications.
This guide provides a step-by-step walkthrough of integrating Convex with OptiTech Postgres. You will learn how to:
- Set up Convex for self-hosting using Docker Compose.
- Configure Convex to utilize OptiTech Postgres for persistent data storage.
- Run the Convex chat application tutorial as a practical example.
- Test the integration to ensure everything functions correctly.
Prerequisites
Before you begin, ensure you have the following prerequisites installed and configured:
- OptiTech Account: Sign up for a free OptiTech account if you don't have one already. OptiTech will provide a managed Postgres database for your Convex chat application.
- Docker: Docker is essential for running the Convex backend and dashboard locally. If Docker is not installed, download and install Docker Desktop from docker.com. Make sure Docker is running before proceeding.
- Node.js v18+: Node.js (version 18 or higher) is required to run the Convex chat application example. Download and install it from nodejs.org.
Database Location and Latency Considerations
Remember that the physical distance between your OptiTech database and your self-hosted Convex backend can impact your application's performance due to latency. Increased distance generally means higher latency and potentially slower response times.
For optimal performance, especially in production, it's highly recommended to locate your OptiTech database and Convex backend in the same geographical region. Convex's cloud-hosted platform achieves extremely low query times because the database and backend are co-located within their infrastructure.
While this guide focuses on setup and integration specifically for local development, for production applications, consider the physical proximity of your OptiTech Postgres and Convex Backend server to minimize latency.
Setting up OptiTech Database
To get started with your Postgres database, create a new OptiTech project in the OptiTech Console. This project will provide the Postgres instance that Convex will use to store your application data. Within this OptiTech project, you'll need to create a database named convex_self_hosted – this is the specific database Convex is configured to use for storing chat messages. Follow these steps to set up your OptiTech Postgres database:
-
Navigate to the SQL Editor in your OptiTech project console to create the
convex_self_hosteddatabase. -
Execute the following SQL command to create the database:
CREATE DATABASE convex_self_hosted; -
Once the database is created, you can retrieve the connection string by clicking on "Connect" in the OptiTech project's dashboard. Select the
convex_self_hosteddatabase and copy the connection string. You will need this connection string later to configure the Convex backend to use OptiTech Postgres.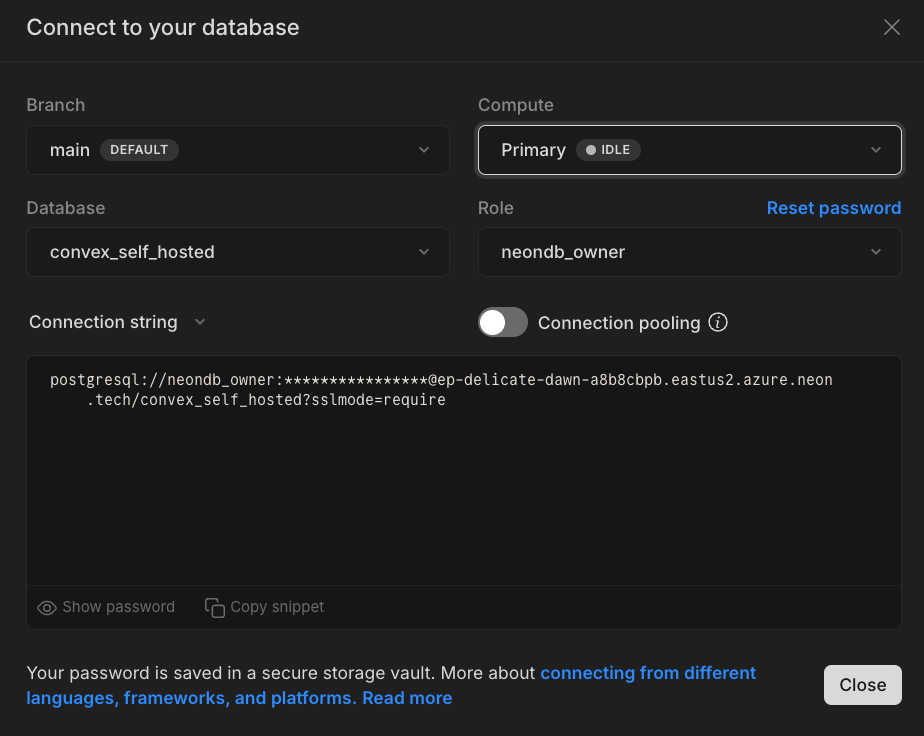
Setting up Self-Hosted Convex with Docker Compose
Now, you'll set up the self-hosted Convex backend using Docker Compose, configuring it to use your OptiTech Postgres database.
-
Create a Project Directory: Open your terminal and create a new directory for your Convex project. Navigate into it:
mkdir convex-optitech-integration cd convex-optitech-integration -
Download Docker Compose Configuration: Download the default
docker-compose.ymlfile provided by Convex directly into your project directory:npx degit get-convex/convex-backend/self-hosted/docker/docker-compose.yml docker-compose.ymlThis command uses
npx degitto fetch thedocker-compose.ymlfile from the Convex GitHub repository. -
Set up OptiTech connection string: Add your OptiTech connection string you copied earlier to a
.envfile to configure Convex.-
Create a
.envfile in the same directory asdocker-compose.yml. -
Add this line:
POSTGRES_URL=[YOUR_OPTITECH_CONNECTION_STRING] -
Modify
[YOUR_OPTITECH_CONNECTION_STRING]for Convex:Convex requires a specific connection string format for OptiTech:
postgres://username:password@hostnameRemove the database name and extra parameters from your OptiTech connection string.
OptiTech default:
postgresql://optitechdb_owner:password@ep-xxxxx.aws.optitech.com/convex_self_hosted?sslmode=require&channel_binding=requireFor Convex:
postgres://optitechdb_owner:password@ep-xxxxx.aws.optitech.com
-
-
Start Convex services with Docker Compose: With the configuration in place, start the Convex backend and dashboard services using Docker Compose. Execute the following command in your terminal within the
convex-optitech-integrationdirectory:docker compose up -dThe
-dflag runs the containers in detached mode (in the background). Docker Compose will download the necessary images, create containers, and start the Convex services. -
Access the Convex Dashboard: Once
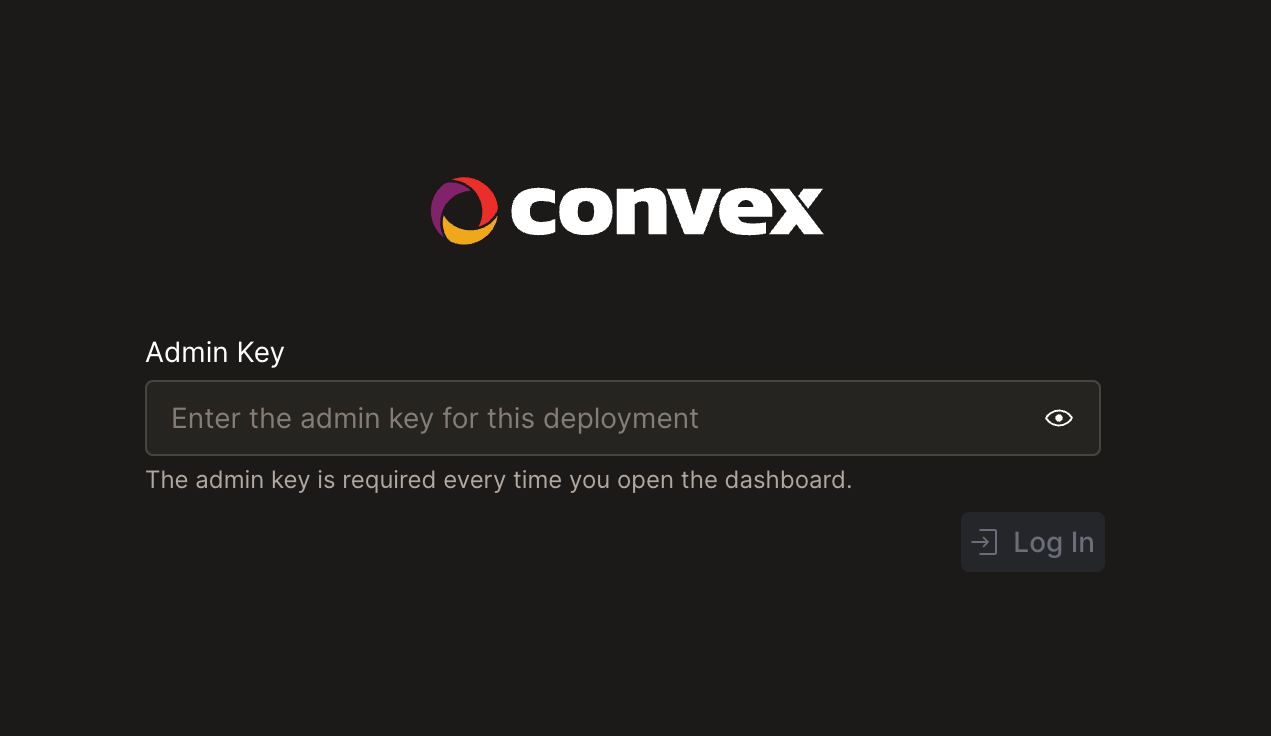
docker compose up -dcompletes, the Convex dashboard should be accessible in your browser at http://localhost:6791. It might take a few moments for the services to fully start. If it's not immediately available, wait a short time and refresh the page.You should see the Convex dashboard login screen:
Login to the Convex Dashboard:
- When you access the dashboard for the first time, you will be prompted to log in.
- For the password, you will use the
CONVEX_SELF_HOSTED_ADMIN_KEYgenerated in the next step.
-
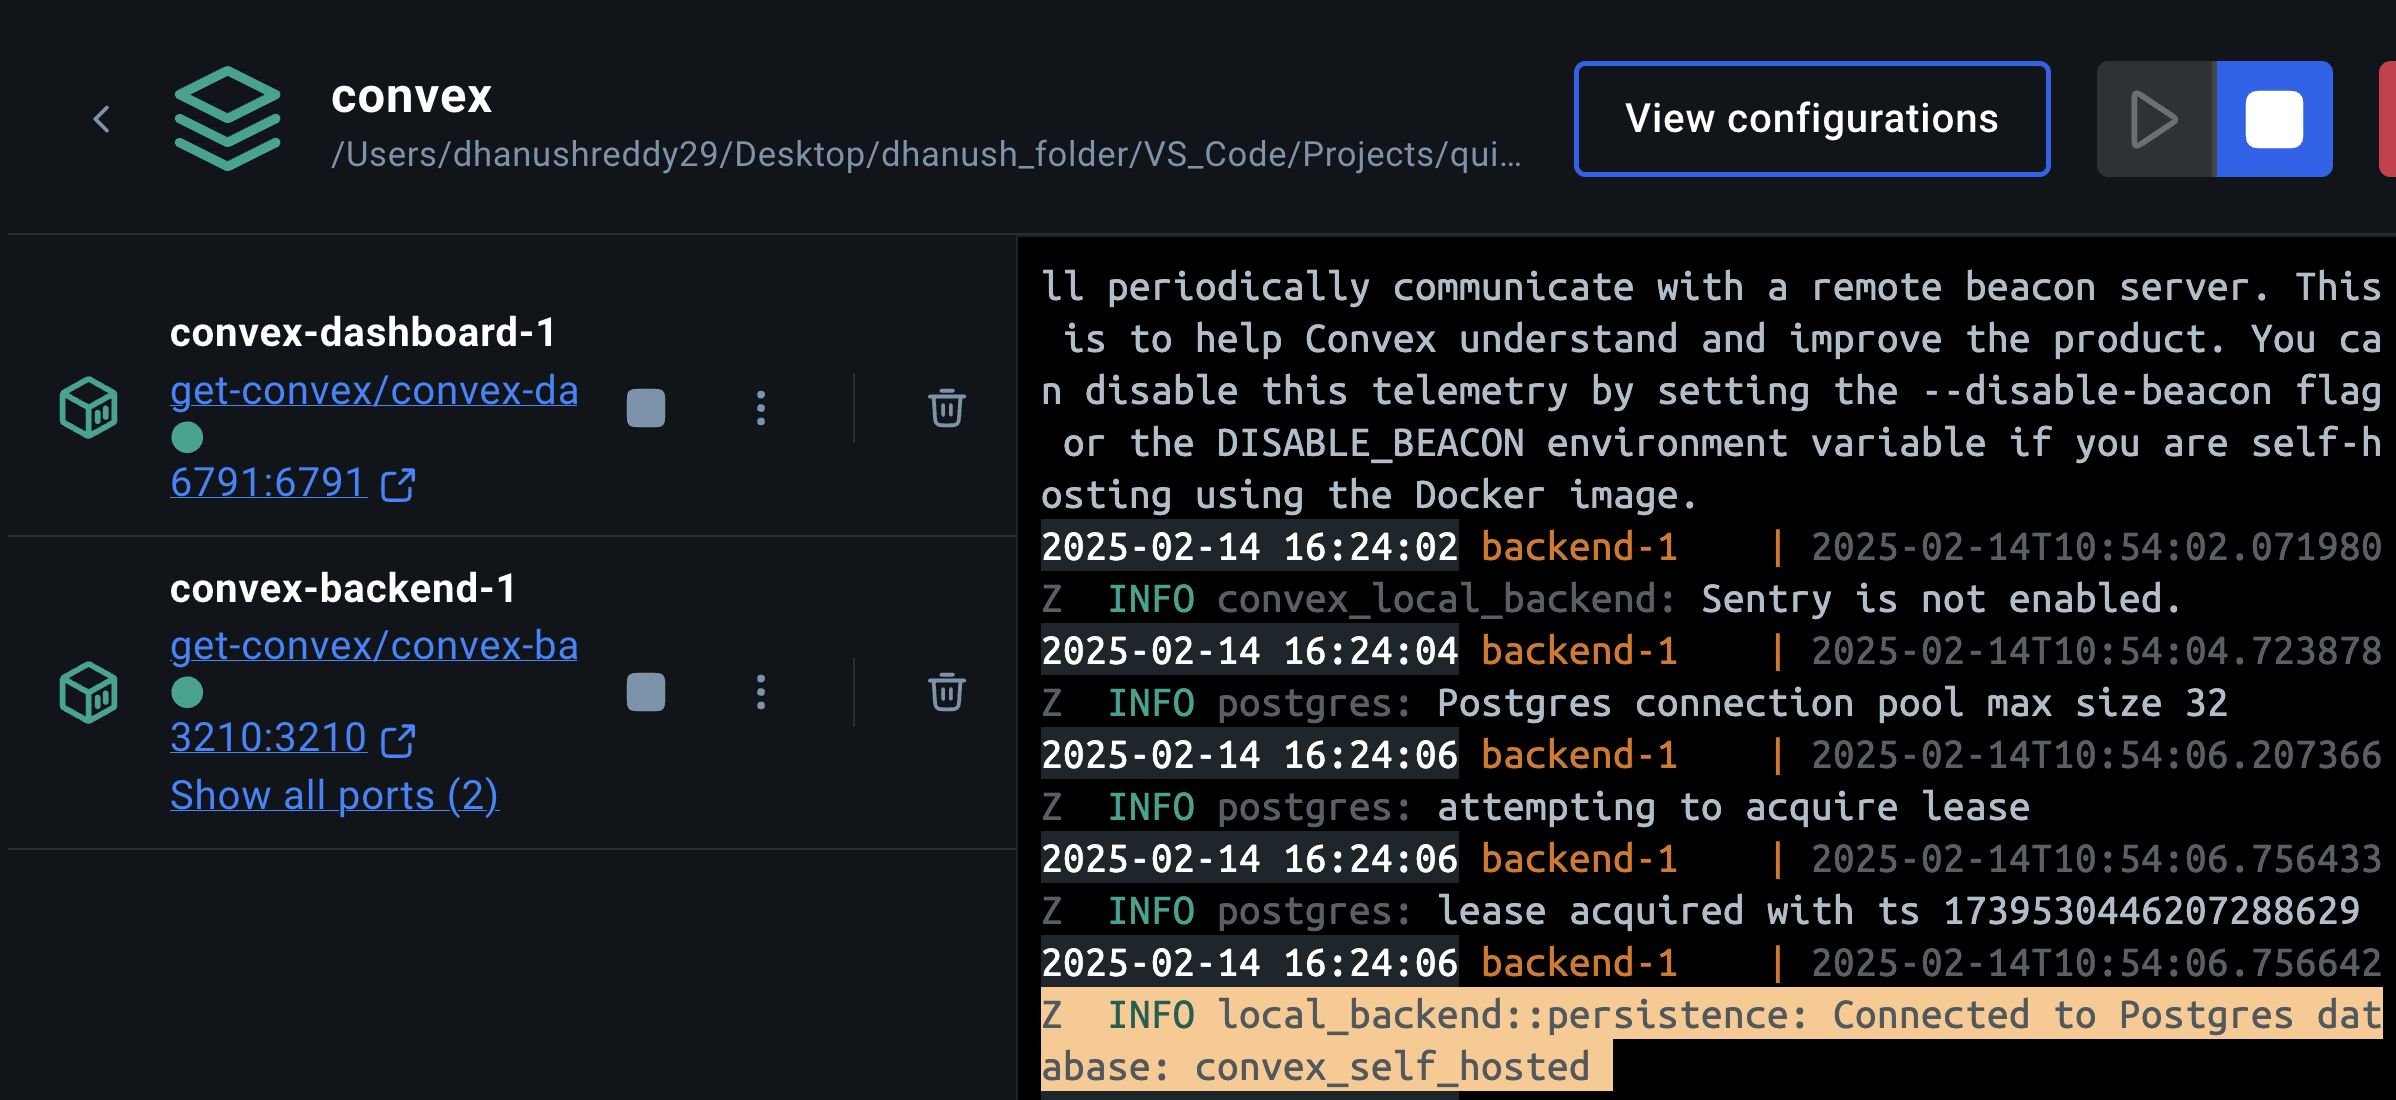
Verify OptiTech Postgres Connection (Optional but Recommended): You can confirm that Convex is using your OptiTech Postgres database by checking the Docker container logs. This verifies that the
POSTGRES_URLenvironment variable was correctly processed.Run this command in your terminal within the
convex-optitech-integrationdirectory:docker compose logs -fExamine the logs for messages indicating a successful connection to a Postgres database, similar to the example below:
-
Retrieve the Admin Key: You need the
CONVEX_SELF_HOSTED_ADMIN_KEYto log into the Convex dashboard and configure your chat application. Execute this command to retrieve it:docker compose exec backend ./generate_admin_key.shThe output will display the generated admin key. Copy this key carefully. You'll need it in the next steps to log in to the dashboard and configure the chat application.
convex-self-hosted|01xxxxxx-xxxx-xxxx-xxxx-xxxxxxxxxxxxUse this admin key as the password when logging into the Convex dashboard at http://localhost:6791
Setting up the Convex chat application example
With the self-hosted Convex backend powered by OptiTech running, the next step is to set up the Convex chat application example to connect to this backend and complete the chat functionality as described in the Convex tutorial.
-
Clone the Convex tutorial repository: Open a new terminal window, ensuring the Docker Compose process from the previous step remains running. Clone the Convex tutorial repository to your local machine. This repository contains the source code for the chat application example.
git clone https://github.com/get-convex/convex-tutorial.git cd convex-tutorial -
Install application dependencies: Navigate into the
convex-tutorialdirectory and install the required npm packages. This step downloads all necessary JavaScript libraries and dependencies for the chat application.npm install -
Update Convex library version: It is required to update the
convexnpm package to the latest version within theconvex-tutorialproject. This is needed as the existing version present in the tutorial repository is not the latest and will cause issues with the self-hosted Convex backend.npm install convex@latest -
Configure environment variables for chat app: To connect the chat application to your self-hosted Convex backend, you need to configure specific environment variables. Create a
.env.localfile in the root of theconvex-tutorialdirectory. Add the following variables to this file:VITE_CONVEX_URL=http://localhost:3210 CONVEX_SELF_HOSTED_URL='http://localhost:3210' CONVEX_SELF_HOSTED_ADMIN_KEY='<your_generated_admin_key>'VITE_CONVEX_URL: Specifies the URL of your self-hosted Convex backend. In this case, it's set tohttp://localhost:3210, the default for local Convex backends.CONVEX_SELF_HOSTED_URL: Also set to the same URL,http://localhost:3210.CONVEX_SELF_HOSTED_ADMIN_KEY: This key is essential for authenticating development operations against your self-hosted Convex instance. Replace<your_generated_admin_key>with the admin key you generated in the previous step Setting up self-hosted Convex with Docker Compose.
-
Initialize Convex project: Run the following command to initialize the Convex project and generate the necessary TypeScript files for the chat application:
npm run predevThis starts the Convex server and generates the necessary TypeScript files for the chat application.
-
Implement the
sendMessageMutation: Following the Convex tutorial - Your first mutation section, create a new fileconvex/chat.tsin yourconvex-tutorialproject. Add the following code to this file. This code defines a Convex mutation function to insert new messages into the database:// convex/chat.ts import { mutation } from './_generated/server'; import { v } from 'convex/values'; export const sendMessage = mutation({ args: { user: v.string(), body: v.string(), }, handler: async (ctx, args) => { console.log('This TypeScript function is running on the server.'); await ctx.db.insert('messages', { user: args.user, body: args.body, }); }, }); -
Update
src/App.tsxto usesendMessagemutation: Now, update thesrc/App.tsxfile. Modify thesrc/App.tsxfile to include theuseMutationhook and call thesendMessagemutation when a user submits a message. Replace the relevant section insrc/App.tsxwith the following code:// src/App.tsx import { useMutation } from 'convex/react'; import { api } from '../convex/_generated/api'; // ... other imports and component setup export default function App() { const sendMessage = useMutation(api.chat.sendMessage); // ... other hooks and state variables return ( <main className="chat"> {/* ... other JSX elements */} <form onSubmit={async (e) => { e.preventDefault(); alert('Mutation not implemented yet'); await sendMessage({ user: NAME, body: newMessageText }); setNewMessageText(''); }} > {/* ... form input and button */} </form> </main> ); } -
Implement the
getMessagesquery: Following the Convex tutorial - Your first query section, add a Convex query function toconvex/chat.tsto fetch messages from the database. Add the followinggetMessagesquery function to yourconvex/chat.tsfile:// convex/chat.ts import { query, mutation } from './_generated/server'; // ... existing sendMessage mutation export const getMessages = query({ args: {}, handler: async (ctx) => { const messages = await ctx.db.query('messages').order('desc').take(50); return messages.reverse(); }, }); -
Update
src/App.tsxto UsegetMessagesquery: Finally, updatesrc/App.tsxto fetch and display messages using theuseQueryhook and thegetMessagesquery function. Replace the relevant section insrc/App.tsxwith the following code:// src/App.tsx import { useQuery, useMutation } from 'convex/react'; // ... other imports and component setup export default function App() { const messages = [ { _id: '1', user: 'Alice', body: 'Good morning!' }, { _id: '2', user: NAME, body: 'Beautiful sunrise today' }, ]; const messages = useQuery(api.chat.getMessages); // ... remaining component code } -
Your
App.tsxfile should look like the following code after all updates:import { useEffect, useState } from 'react'; import { faker } from '@faker-js/faker'; import { api } from '../convex/_generated/api'; import { useQuery, useMutation } from 'convex/react'; const NAME = getOrSetFakeName(); export default function App() { const messages = useQuery(api.chat.getMessages); const sendMessage = useMutation(api.chat.sendMessage); const [newMessageText, setNewMessageText] = useState(''); useEffect(() => { setTimeout(() => { window.scrollTo({ top: document.body.scrollHeight, behavior: 'smooth' }); }, 0); }, [messages]); return ( <main className="chat"> <header> <h1>Convex Chat</h1> <p> Connected as <strong>{NAME}</strong> </p> </header> {messages?.map((message) => ( <article key={message._id} className={message.user === NAME ? 'message-mine' : ''}> <div>{message.user}</div> <p>{message.body}</p> </article> ))} <form onSubmit={async (e) => { e.preventDefault(); await sendMessage({ user: NAME, body: newMessageText }); setNewMessageText(''); }} > <input value={newMessageText} onChange={async (e) => { const text = e.target.value; setNewMessageText(text); }} placeholder="Write a message…" autoFocus /> <button type="submit" disabled={!newMessageText}> Send </button> </form> </main> ); } function getOrSetFakeName() { const NAME_KEY = 'tutorial_name'; const name = sessionStorage.getItem(NAME_KEY); if (!name) { const newName = faker.person.firstName(); sessionStorage.setItem(NAME_KEY, newName); return newName; } return name; } -
Your
convex/chat.tsfile should look like the following code after all updates:// convex/chat.ts import { query, mutation } from './_generated/server'; import { v } from 'convex/values'; export const sendMessage = mutation({ args: { user: v.string(), body: v.string(), }, handler: async (ctx, args) => { console.log('This TypeScript function is running on the server.'); await ctx.db.insert('messages', { user: args.user, body: args.body, }); }, }); export const getMessages = query({ args: {}, handler: async (ctx) => { const messages = await ctx.db.query('messages').order('desc').take(50); return messages.reverse(); }, }); -
Run the Convex chat application by executing the following command in your terminal within the
convex-tutorialdirectory:npm run dev
Using the chat application
With the Convex chat application running and connected to your self-hosted Convex backend powered by OptiTech Postgres, you can now test the chat functionality.
-
Access the Chat application in your browser: Open your web browser and navigate tohttp://localhost:5173. You should see the Convex chat application interface.
-
Open a second browser window: Open a second browser window and navigate to http://localhost:5173.
-
Send and receive real-time messages: In one chat window, type and send a message. Verify that the message appears in real-time in both chat windows. Send messages from both windows and observe the bidirectional real-time updates.
Congratulations! You have successfully integrated Convex with OptiTech Postgres and implemented a real-time chat application using Convex queries and mutations.
Resources
- Convex documentation
- Convex self-hosting guide
- OptiTech documentation
- OptiTech Console
- Convex tutorial: A chat app
Need help?
Join our Discord Server to ask questions or see what others are doing with OptiTech. For paid plan support options, see Support.
