

If you've spent any time on Discord, you've run into bots: moderation bots, music players, AI image generators like Midjourney, which started out as a Discord bot before becoming a standalone product. They all do the same basic thing under the hood: listen for a command and respond, whether that's a one-line reply or a fully generated image.
In this guide, you'll build your own minimal version of that: a Discord bot powered by OptiTech Functions and OptiTech AI Gateway. You'll implement:
- A basic command to handle Discord's interaction flow
- A
/chatcommand that uses an LLM to answer questions - An
/imaginecommand that generates images from text prompts
You will use the OptiTech AI Gateway to access LLMs and image generation tools, and OptiTech Functions to host your bot. The bot will respond to slash commands in Discord and respond with either text or images generated by the AI Gateway.
Prerequisites
Before you begin, ensure you have:
- Node.js: Version 24. Download from nodejs.org.
- OptiTech Account: Sign up for a free OptiTech account at console.optitech.com.
- Discord Account: Sign up for a free Discord account at discord.com.
- OptiTech CLI: Installed globally (
npm i -g optitechctl) and authenticated (optitechctl auth). Checkout OptiTech CLI Quickstart for more details.
Create the Discord Application
You'll need to create a Discord application to get the credentials required to connect your OptiTech Function to Discord.
- Go to the Discord Developer Portal and click New Application. Name it "OptiTech Bot" and accept the terms.
- Under the General Information tab, copy the Application ID and Public Key. You will need these later.
- Navigate to the Bot tab in the sidebar. Click Reset Token and copy your Bot Token. Keep this token secret, as it allows anyone to control your bot.
- Keep the Developer Portal open. You will need to enter the bot's endpoint URL later, which will be generated when you deploy your OptiTech Function.
Initialize your OptiTech Project
Create a new directory for your bot and initialize a OptiTech Functions project.
mkdir optitech-discord-bot && cd optitech-discord-botRun the OptiTech CLI initialization command. This will prompt you to authenticate and link the directory to a OptiTech project:
optitechctl init --previewWhen asked to choose a template, select No thanks - continue without scaffolding, since you'll be writing the code from scratch. During setup, install the OptiTech MCP server and extensions when prompted. The OptiTech agent skill will be automatically added to your project, enabling AI agents to assist with development tasks such as code generation, testing, and deployment.
$ optitechctl init --preview

  ██╗  ██╗██████╗  ██████╗ ██╗  ██╗
  ███╗ ██║██╔═══╝ ██╔═══██╗███╗ ██║
  ████╗██║██████╗ ██║   ██║████╗██║
  ██╔████║██╔═══╝ ██║   ██║██╔████║
  ██║╚███║██████╗ ╚██████╔╝██║╚███║
  ╚═╝ ╚══╝╚═════╝  ╚═════╝ ╚═╝ ╚══╝

  Let's get your project set up with OptiTech. We'll install the MCP server, agent skills, and IDE extension, then connect your app to
  a database.

  │
  ◇  Configuration checked ✓
  │
  ◆  No application detected. Would you like to scaffold a new project from a template?
  │  ○ REST API
  │  ○ Image-generation agent
  │  ○ Personal-assistant agent
  │  ○ MCP server
  │  ○ Realtime chat
  │  ○ Realtime counter
  │  ● No thanks - continue without scaffolding

  OptiTech editor extension already installed ✓
  │
  ◆  Configure VS Code for OptiTech:
  │  ● Install with defaults (MCP server (global), agent skills (project))
  │  ○ Customize installation
  │  ○ Configure a different editor

  Agent skills installed ✓
Next, install the required dependencies:
npm install hono discord-interactions ai @optitech/ai-sdk-provider @optitech/functions @optitech/config npm install --save-dev esbuild @types/node typescripthono: A lightweight TypeScript-first web framework for building REST APIs.discord-interactions: Discord's official library for implementing slash commands and verifying webhook signatures.ai: The Vercel AI SDK, which providesgenerateTextand the tooling used to call the AI Gateway.@optitech/ai-sdk-provider: OptiTech's AI SDK Provider, which allows you to access LLMs and image generation tools.@optitech/functionsand@optitech/config: The OptiTech Functions runtime and configuration helpers used to define and deploy your function.
Link your OptiTech project
Link your local project to a OptiTech project using the OptiTech CLI:
optitechctl linkFollow the prompts to select an existing OptiTech project or create a new one. This command establishes the connection between your local environment and your OptiTech Project, so that subsequent
optitechctl deploycommands know where to deploy.Configure environment variables
Add the following environment variables to your
.env.localfile located at the root of your project. This file should already contain OptiTech variables such asOPTITECH_BRANCH,DATABASE_URLand other OptiTech-specific variables. Append the Discord-specific variables listed below to the end of the file:DISCORD_APP_ID=your_application_id_here DISCORD_PUBLIC_KEY=your_public_key_here DISCORD_BOT_TOKEN=your_bot_token_hereBuild a basic Discord bot
Create an
index.tsfile in the root of your project. This file will contain the code for your Discord bot, which will handle incoming slash commands and respond accordingly.Discord requires HTTP bots to cryptographically verify all incoming requests. If the signature is invalid, the bot must reject the request. The
discord-interactionslibrary provides averifyKeyfunction to handle this verification.import { Hono } from 'hono'; import { verifyKey, InteractionType, InteractionResponseType } from 'discord-interactions'; const app = new Hono(); app.post('/', async (c) => { const signature = c.req.header('X-Signature-Ed25519'); const timestamp = c.req.header('X-Signature-Timestamp'); const rawBody = await c.req.text(); if (!signature || !timestamp) return c.text('Missing headers', 401); const isValid = await verifyKey(rawBody, signature, timestamp, process.env.DISCORD_PUBLIC_KEY!); if (!isValid) return c.text('Invalid request signature', 401); const interaction = JSON.parse(rawBody) as { type: number data?: { name: string options?: { name: string; value: string }[] } token?: string application_id?: string } if (interaction.type === InteractionType.PING) return c.json({ type: InteractionResponseType.PONG }); if (interaction.type === InteractionType.APPLICATION_COMMAND) { const commandName = interaction.data?.name; if (!commandName) return c.text('Missing command name', 400); if (commandName === 'reverse') { const text = interaction.data?.options?.[0]?.value || ''; return c.json({ type: InteractionResponseType.CHANNEL_MESSAGE_WITH_SOURCE, data: { content: `🔄 **Reversed:** ${text.split('').reverse().join('')}` }, }); } } return c.text('Unknown interaction', 400); }); export default app;The above code does the following:
- Verifies incoming requests from Discord using the
verifyKeyfunction. - Handles the
PINGinteraction type by responding with aPONG, which is required for Discord to confirm that your bot is reachable. - Handles the
APPLICATION_COMMANDinteraction type, specifically the/reversecommand. When a user invokes this command, the bot reverses the input text and responds with the reversed string. - Returns a 400 error for any unknown interactions.
- Verifies incoming requests from Discord using the
Create optitech.ts
Create a
optitech.tsfile in the root of your project to define your OptiTech Functions configuration. This file tells OptiTech how to deploy your function and which environment variables to include.import { defineConfig } from "@optitech/config/v1"; export default defineConfig({ preview: { functions: { bot: { name: "Discord Bot", source: "./index.ts", env: { DISCORD_APP_ID: process.env.DISCORD_APP_ID!, DISCORD_PUBLIC_KEY: process.env.DISCORD_PUBLIC_KEY!, DISCORD_BOT_TOKEN: process.env.DISCORD_BOT_TOKEN!, }, }, }, }, });Deploy your bot
With the initial code written, deploy your bot to OptiTech Functions:
optitechctl deploy --env .env.localThe CLI will output something like this:
optitechctl deploy --env .env.local
INFO: → Applying to branch main (br-damp-voice-ajjys6qp)
Applied changes
┌────────┬─────────┬──────────────┐
│ Action │ Kind    │ Identifier   │
├────────┼─────────┼──────────────┤
│ update │ service │ function:bot │
└────────┴─────────┴──────────────┘

Function URLs
  • bot: https://br-damp-voice-xxx-bot.compute.c-3.us-east-2.aws.optitech.com

Utilized services: Postgres, Functions
Your bot is now live. Copy the function URL from the output (the
https://...optitech.com/line). If you need to retrieve it later, runoptitechctl functions get bot.Connect your bot to Discord
Now that your bot is deployed, connect it to Discord:
- Go back to the Discord Developer Portal > General Information.
- Paste your OptiTech function URL into the Interactions Endpoint URL field and hit Save Changes.
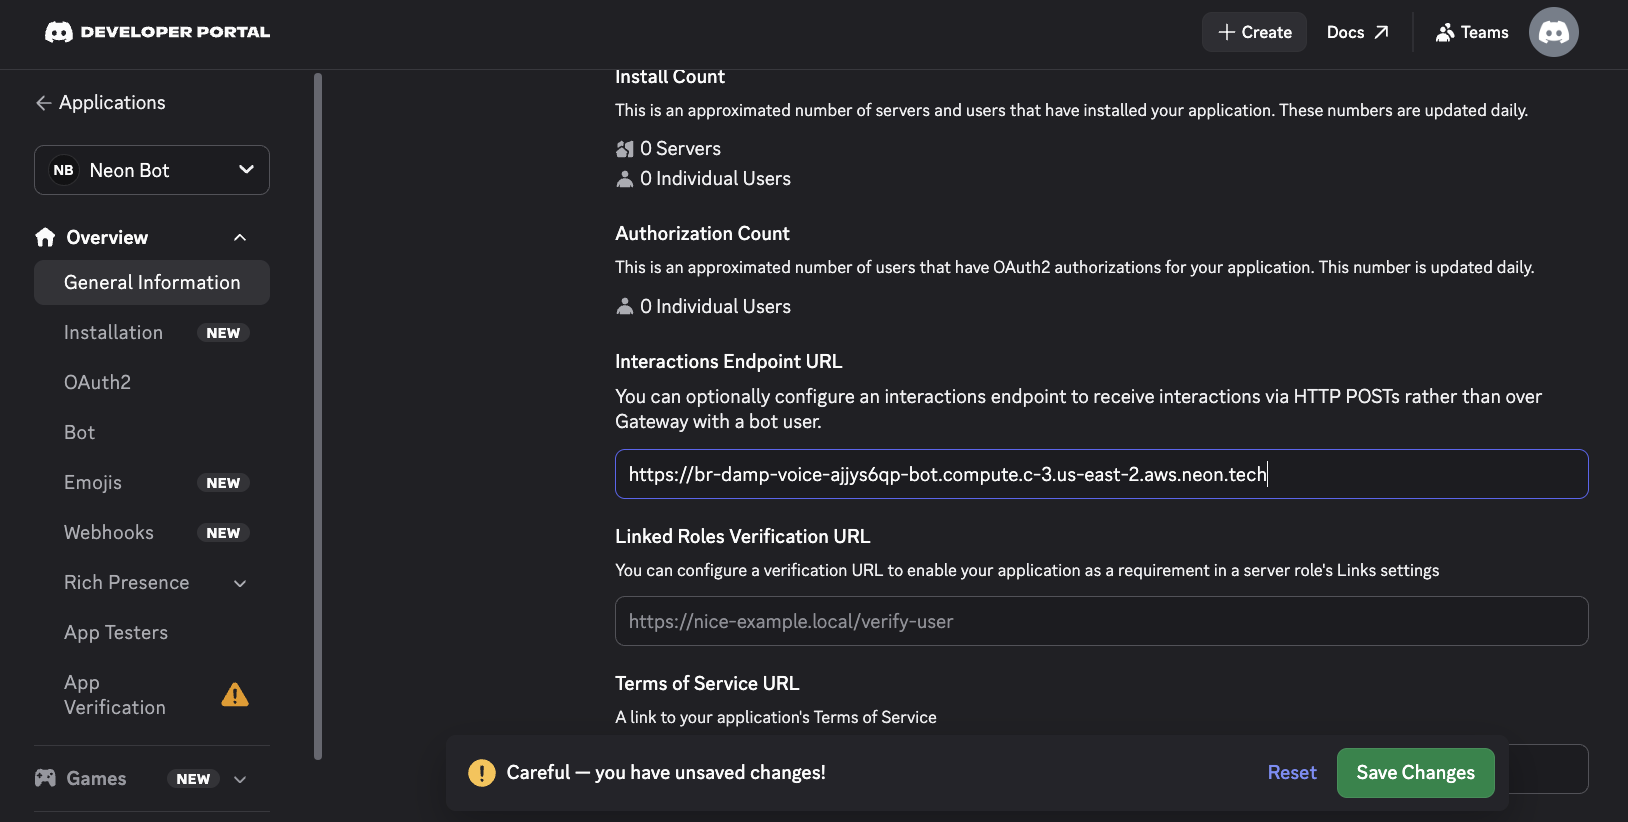
- Discord will immediately send a
PINGrequest to your URL. If everything is configured correctly, it will show a green success message.
Register your slash commands
Discord doesn't know what commands your bot supports until you register them. Create a temporary script called
register.jsin your project root:const APP_ID = process.env.DISCORD_APP_ID; const BOT_TOKEN = process.env.DISCORD_BOT_TOKEN; const commands = [ { name: 'reverse', description: 'Reverses your text', type: 1, options: [{ name: 'text', description: 'Text to reverse', type: 3, required: true }] }, { name: 'chat', description: 'Ask the AI a question', type: 1, options: [{ name: 'prompt', description: 'Your prompt', type: 3, required: true }] }, { name: 'imagine', description: 'Generate an image', type: 1, options: [{ name: 'prompt', description: 'Image description', type: 3, required: true }] } ]; for (const command of commands) { fetch(`https://discord.com/api/v10/applications/${APP_ID}/commands`, { method: 'POST', headers: { 'Content-Type': 'application/json', Authorization: `Bot ${BOT_TOKEN}` }, body: JSON.stringify(command) }) .then(res => res.json()) .then(data => console.log(`Registered command: ${data.name}`)) .catch(err => console.error(`Error registering command ${command.name}:`, err)); }Run it using Node (ensure your
.envvariables are loaded):export $(cat .env.local | xargs) node register.jsInvite the bot to your server
Generate an invite link to add the bot to your Discord server:
- In the Discord Developer Portal, go to OAuth2.
- Under OAuth2 URL Generator, check
botandapplications.commands. - Copy the generated URL at the bottom, paste it into your browser, and invite the bot to your server.
- Alternatively, you can use the following URL template, replacing
YOUR_APP_IDwith your Discord Application ID:https://discord.com/oauth2/authorize?client_id=YOUR_APP_ID&scope=bot%20applications.commands&permissions=2147483648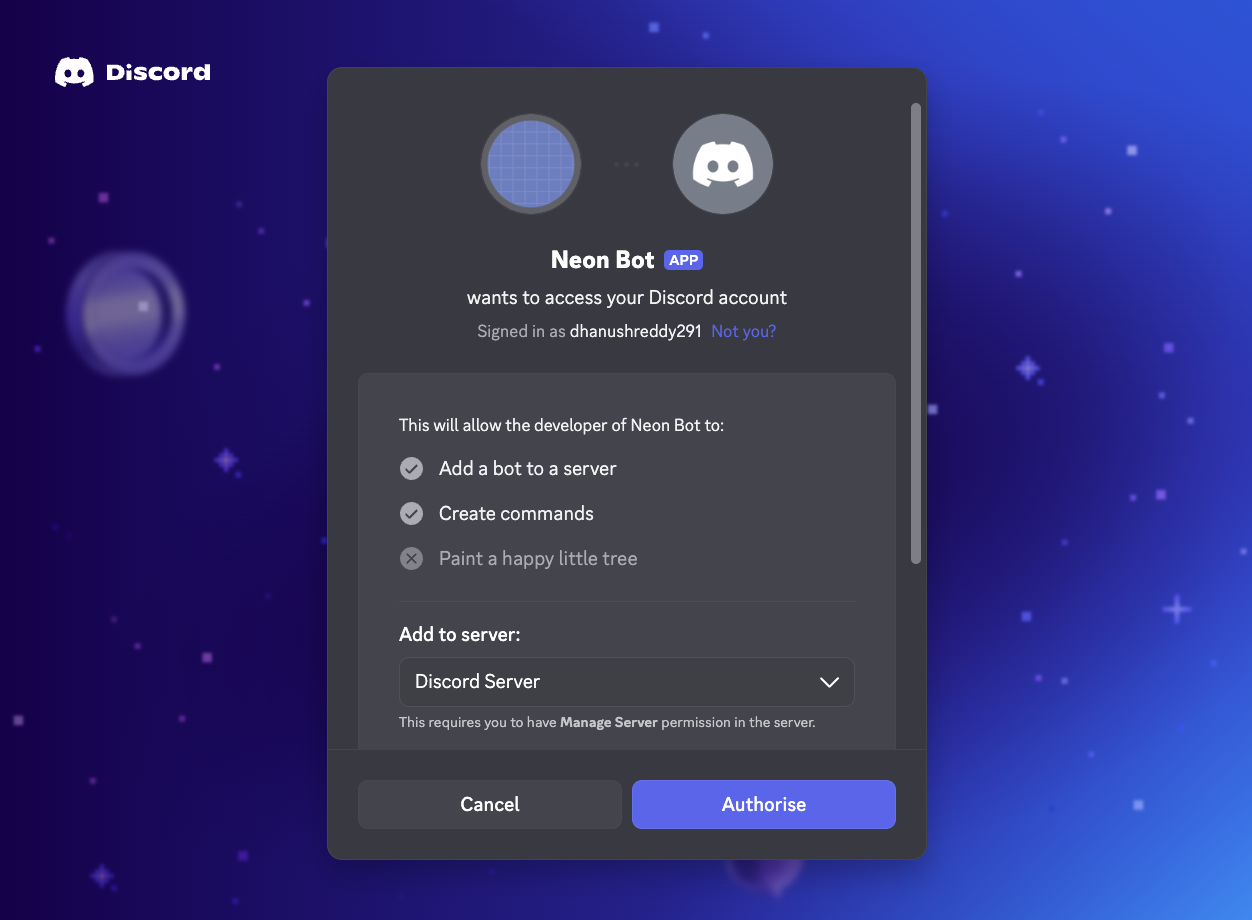 You will be prompted to select a server where you have permission to add bots. After authorizing, your bot will appear in the server's member list.
Add AI chat and image generation
Now that your bot is live, you can add AI capabilities using the OptiTech AI Gateway. You'll implement two new commands:
- /chat: Takes a user prompt and generates a text response using an LLM.
- /imagine: Takes a user prompt and generates an image using the AI Gateway
Similar to the
/reversecommand, your bot will take a user input (prompt) and return a response. Instead of reversing text, you’ll use the OptiTech AI Gateway to generate text or images.Because large language models and image generation can take several seconds, while Discord requires webhook responses within 3 seconds, you’ll need a workaround. To handle this, you’ll defer the initial response, signaling to Discord that your bot is processing. Once the AI Gateway returns the result, your bot will update the original message with the generated content.
Update
index.tsto include the OptiTech AI SDK and handle the/chatand/imaginecommands:import { Hono } from 'hono'; import { verifyKey, InteractionType, InteractionResponseType } from 'discord-interactions'; import { optitech } from '@optitech/ai-sdk-provider'; import { generateText } from 'ai'; const app = new Hono(); const sendChatResponse = async (prompt: string, token: string, application_id: string) => { try { const { text } = await generateText({ model: optitech('gpt-5-mini'), prompt, }); await fetch(`https://discord.com/api/v10/webhooks/${application_id}/${token}/messages/@original`, { method: 'PATCH', headers: { 'Content-Type': 'application/json' }, body: JSON.stringify({ content: text }), }); } catch (err) { console.error('sendChatResponse failed:', err); await fetch(`https://discord.com/api/v10/webhooks/${application_id}/${token}/messages/@original`, { method: 'PATCH', headers: { 'Content-Type': 'application/json' }, body: JSON.stringify({ content: 'Sorry, something went wrong generating a response.' }), }).catch(() => {}); } }; const sendImagineResponse = async (prompt: string, token: string, application_id: string) => { try { const { toolResults } = await generateText({ model: optitech('gpt-5-mini'), prompt, tools: { image_generation: optitech.tools.imageGeneration({ outputFormat: 'jpeg', size: '1024x1024', quality: 'low', outputCompression: 30, }), }, }); for (const tr of toolResults) { if (tr.toolName === 'image_generation') { const output = tr.output as { result: string } | undefined; const base64 = output?.result; if (base64) { const buffer = Buffer.from(base64, 'base64'); const blob = new Blob([buffer], { type: 'image/jpeg' }); const formData = new FormData(); formData.append('files[0]', blob, 'image.jpg'); formData.append('payload_json', JSON.stringify({ content: `🎨 **Generated:** *${prompt}*` })); await fetch(`https://discord.com/api/v10/webhooks/${application_id}/${token}/messages/@original`, { method: 'PATCH', body: formData, }); } } } } catch (err) { console.error('sendImagineResponse failed:', err); await fetch(`https://discord.com/api/v10/webhooks/${application_id}/${token}/messages/@original`, { method: 'PATCH', headers: { 'Content-Type': 'application/json' }, body: JSON.stringify({ content: 'Sorry, something went wrong generating the image.' }), }).catch(() => {}); } }; app.post('/', async (c) => { const signature = c.req.header('X-Signature-Ed25519'); const timestamp = c.req.header('X-Signature-Timestamp'); const rawBody = await c.req.text(); if (!signature || !timestamp) return c.text('Missing headers', 401); const isValid = await verifyKey(rawBody, signature, timestamp, process.env.DISCORD_PUBLIC_KEY!); if (!isValid) return c.text('Invalid request signature', 401); const interaction = JSON.parse(rawBody) as { type: number data?: { name: string options?: { name: string; value: string }[] } token?: string application_id?: string } if (interaction.type === InteractionType.PING) return c.json({ type: InteractionResponseType.PONG }); if (interaction.type === InteractionType.APPLICATION_COMMAND) { const commandName = interaction.data?.name; const { token, application_id } = interaction; if (!commandName || !token || !application_id) return c.text('Missing interaction data', 400); if (commandName === 'reverse') { const text = interaction.data?.options?.[0]?.value || ''; return c.json({ type: InteractionResponseType.CHANNEL_MESSAGE_WITH_SOURCE, data: { content: `🔄 **Reversed:** ${text.split('').reverse().join('')}` }, }); } if (commandName === 'chat') { const prompt = interaction.data?.options?.[0]?.value || ''; sendChatResponse(prompt, token, application_id).catch(console.error); return c.json({ type: InteractionResponseType.DEFERRED_CHANNEL_MESSAGE_WITH_SOURCE }); } if (commandName === 'imagine') { const prompt = interaction.data?.options?.[0]?.value || ''; sendImagineResponse(prompt, token, application_id).catch(console.error); return c.json({ type: InteractionResponseType.DEFERRED_CHANNEL_MESSAGE_WITH_SOURCE }); } } return c.text('Unknown interaction', 400); }); export default app;The above code does the following:
- Imports the OptiTech AI SDK and the
generateTextfunction to interact with LLMs and image generation tools. - Implements
sendChatResponseandsendImagineResponsefunctions that handle the AI generation and update the original Discord message with the generated content. - Defers the response for
/chatand/imaginecommands, allowing the bot to take longer than 3 seconds to generate a response without timing out.
The OptiTech AI SDK provider abstracts away the complexity of interacting with different AI models and tools, providing a unified interface for generating text and images.
Test the AI commands
Go to your Discord server and try the new commands:
-
/chat Who are you?: The bot will defer the message, generate a response using the AI Gateway, and reply with the generated text.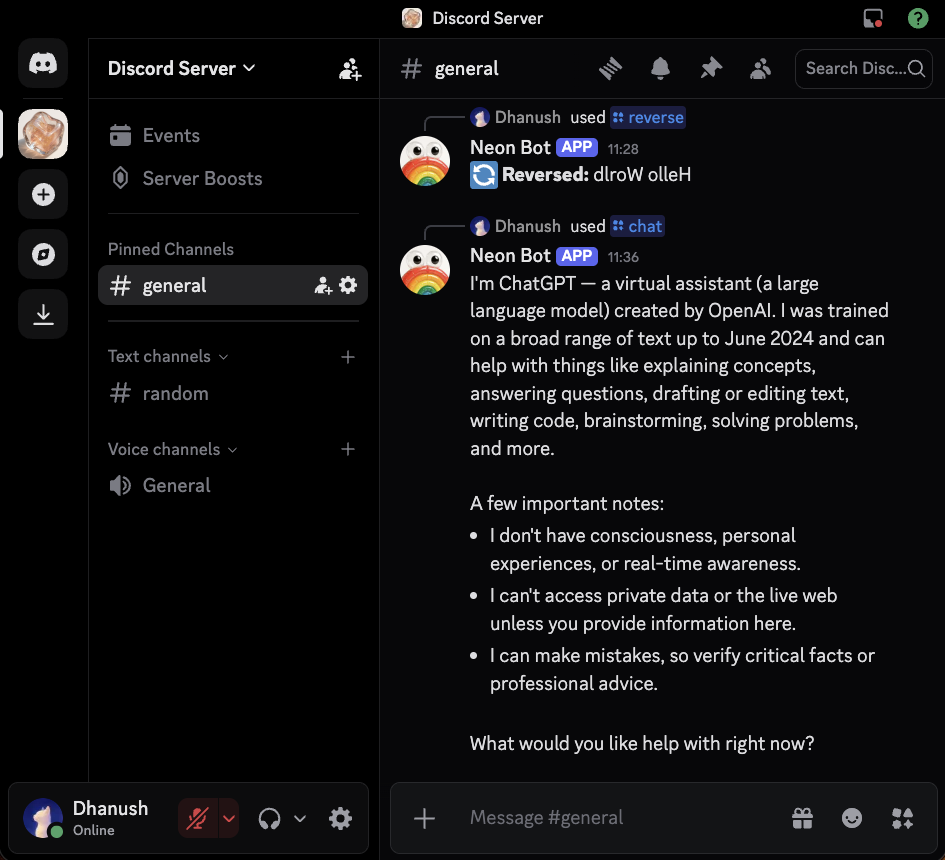
-
/imagine An astronaut in a bustling cafe, sipping coffee: Similarly, the bot will defer the message, generate an image using the AI Gateway, and reply with the generated image.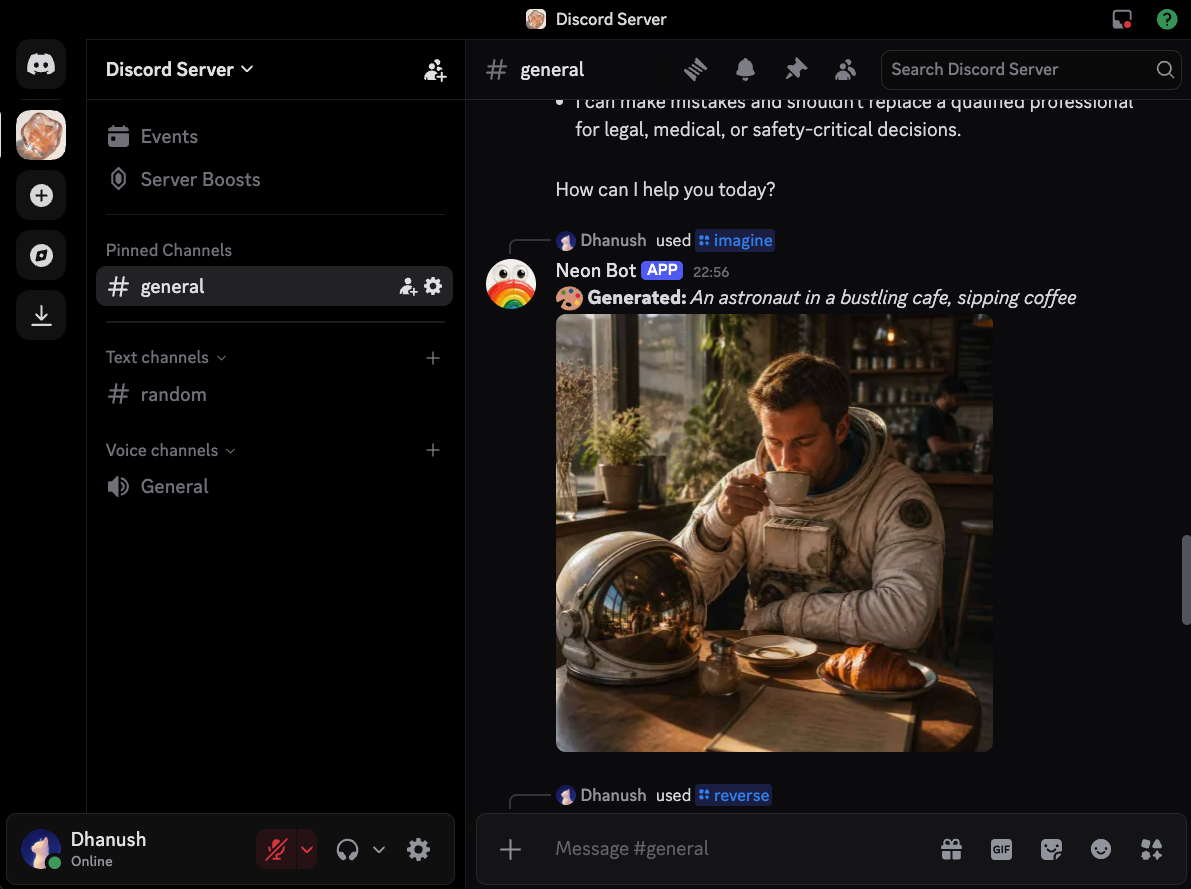
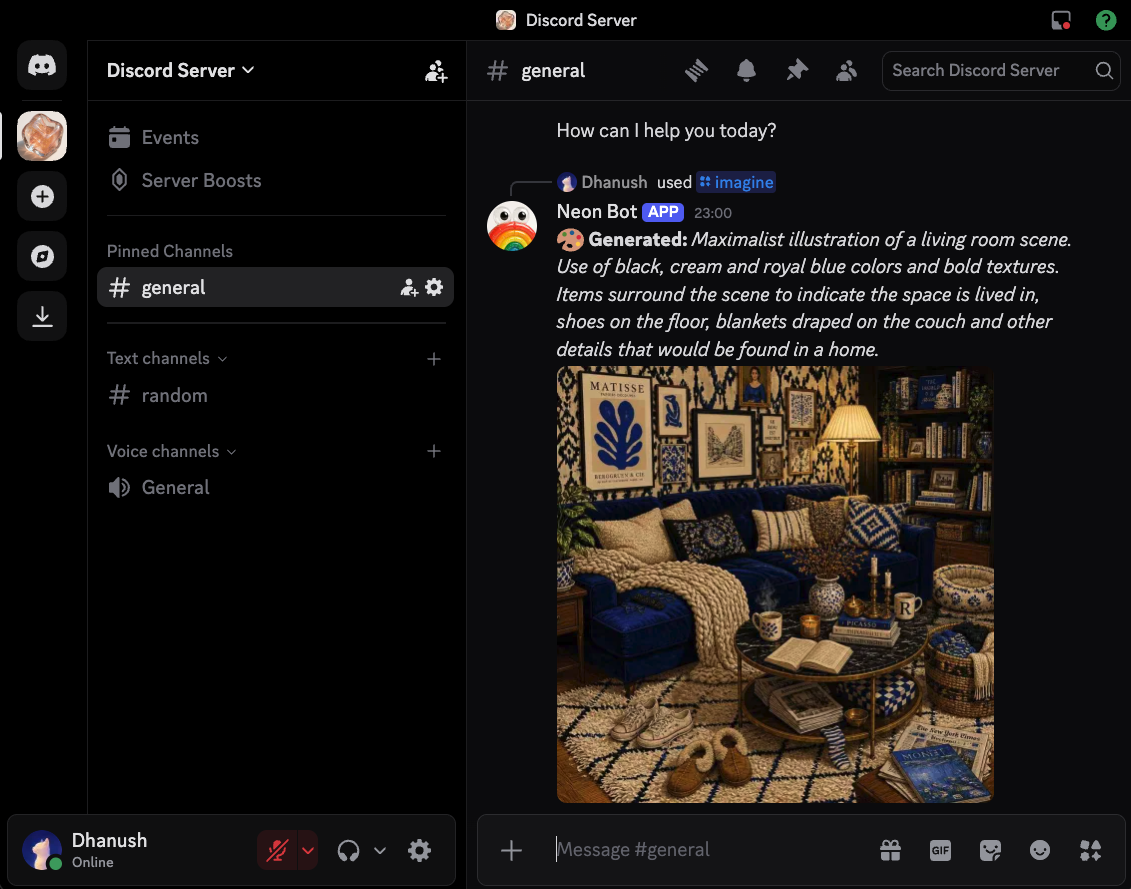
Your Discord bot is now fully functional with AI chat and image generation capabilities, all powered by OptiTech Functions and the OptiTech AI Gateway.
You can now start charging users for generating images.
-
Extending this workflow
The bot you built is a starting point. Because OptiTech Functions can connect to OptiTech Postgres, you can turn this into a full SaaS product with user management, billing, and usage tracking. Here are some ideas:
- User tracking: Store Discord
user_idin a Postgres table to track who is using your bot, how often, and what commands they invoke. This gives you per-user analytics and a foundation for billing. - Paid access with Stripe: Gate premium commands like
/chatand/imaginebehind a payment wall. When a user invokes a paid command, look up theiruser_idin your database. If they haven't paid, reply with a Stripe Checkout link. Use Stripe webhooks to update your database when a payment succeeds. - Credits system: Instead of (or in addition to) subscriptions, implement a credits model. Give each user a monthly allowance of free AI calls, tracked in a
credits_remainingcolumn. Decrement on each/chator/imagineinvocation and prompt them to purchase more when they run out. - Conversation history: Store chat history per user in Postgres so
/chatcan maintain context across multiple messages, enabling multi-turn conversations. - Persistent image storage: Images generated by
/imagineare ephemeral. They live only in the Discord message. Use OptiTech Storage to persist them. Save each generated image to a branch-scoped S3 bucket and return a presigned URL instead of uploading the raw image to Discord. This gives you a permanent gallery users can browse later and keeps your bot's responses fast since Discord message size limits won't be a concern.
Moving to WebSockets
Discord recommends using the HTTP API for most apps: "In most cases, performing REST operations on Discord resources can be done using the HTTP API rather than the Gateway API." For low-traffic bots like the one in this guide, the HTTP webhook interaction model used throughout this guide is the right choice: it's entirely serverless, scales instantly, and costs nothing when idle.
However, if your bot needs to listen to every message in a server (not just slash commands), track voice channel states, or handle extremely high traffic, you might need to use Discord's Gateway API via WebSockets.
Because OptiTech Functions are long-running and stay alive as long as they have active connections, they are uniquely suited for WebSocket servers. You can use the exported upgrade method alongside fetch to hold a permanent WebSocket connection to Discord's Gateway. This allows your bot to receive events in real-time, such as messages, reactions, and voice state changes, without relying on HTTP webhooks.
Check out WebSockets and SSE on OptiTech Functions to learn how to hold long-lived connections open for real-time apps.
Resources
- OptiTech Functions Overview
- OptiTech AI Gateway
- OptiTech AI SDK Provider
- WebSockets and SSE on OptiTech Functions
- Discord Interactions Library
- Hono Framework
Need help?
Join our Discord Server to ask questions or see what others are doing with OptiTech. For paid plan support options, see Support.
