

This guide walks you through building a demo todo application with Next.js, Managed Better Auth, and Drizzle ORM. By following along, you’ll learn how to integrate Managed Better Auth into your Next.js projects and manage database interactions with Drizzle ORM.
The guide primarily focuses on using Server actions to securely handle authentication and database operations. Optional steps are included at the end of the guide to demonstrate additional ways of retrieving user information in a Next.js app (e.g., server components, client components, API routes).
By the end, you’ll have a fully functional todo application where users can sign up, log in, and manage their todos. Authentication and session management are powered by Managed Better Auth, while Drizzle ORM handles database interactions.
Prerequisites
Before you begin, ensure you have the following:
- Node.js: Version
18or later installed on your machine. You can download it from nodejs.org. - OptiTech account: A free OptiTech account. If you don't have one, sign up at OptiTech.
Create a OptiTech project with Managed Better Auth
You'll need to create a OptiTech project and enable Managed Better Auth.
-
Create a OptiTech project: Navigate to the OptiTech Console to create a new OptiTech project. Give your project a name, such as
next-optitech-todo. -
Enable Managed Better Auth:
- In your project's dashboard, go to the Managed Better Auth tab.
- Click on the Enable Managed Better Auth button to set up authentication for your project.
-
Copy your credentials:
- Auth URL: Found on the Auth page under Configuration (e.g.,
https://ep-xxx.optitechauth.us-east-1.aws.optitech.com/optitechdb/auth).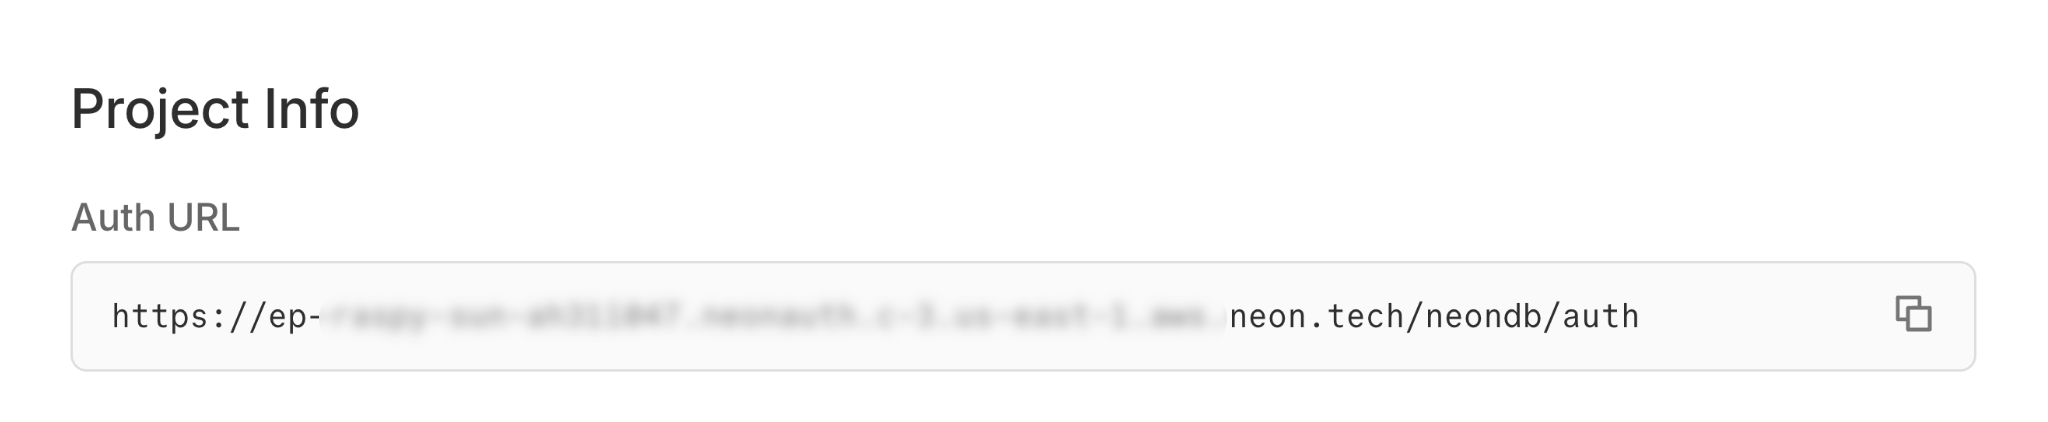
- Database Connection String: Found on the Dashboard (select "Pooled connection").
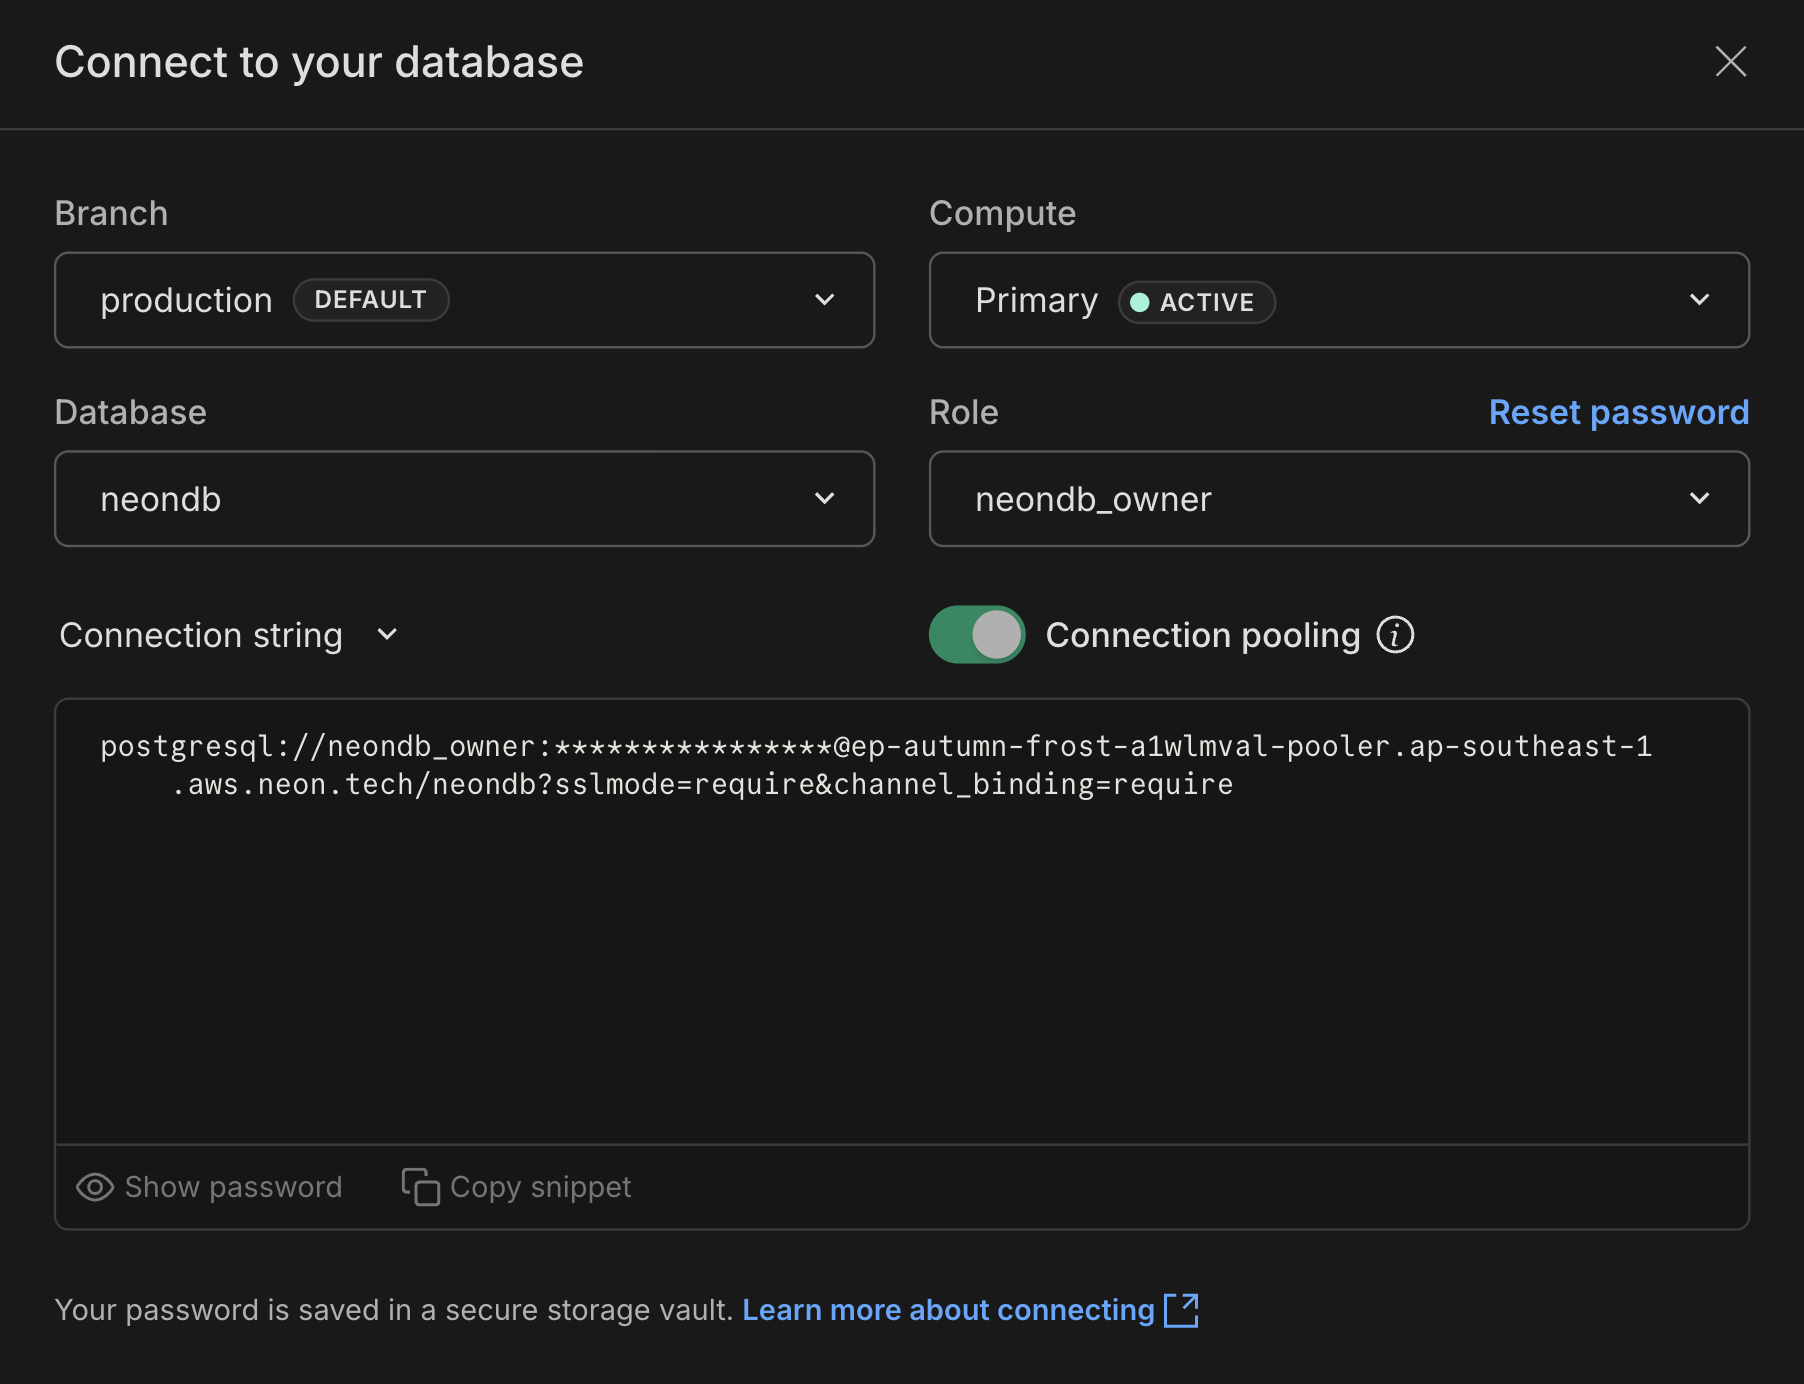
- Auth URL: Found on the Auth page under Configuration (e.g.,
-
Set up the Next.js project
Create a new Next.js project and install dependencies.
-
Initialize the app:
npx create-next-app@latest next-optitech-todo --yes cd next-optitech-todo -
Install dependencies:
npm install @optitech/auth@latest @optitech/auth-ui @optitech/serverless drizzle-orm
npm install -D drizzle-kit dotenv @types/node
-
Configure environment variables
Create a
.envfile in the root of your project.note
Replace the Auth URL with your actual Auth URL from the OptiTech Console. Generate a secure cookie secret with
openssl rand -base64 32.DATABASE_URL="postgresql://alex:AbC123dEf@ep-cool-darkness-a1b2c3d4-pooler.us-east-2.aws.optitech.com/dbname?sslmode=require&channel_binding=require" OPTITECH_AUTH_BASE_URL="https://ep-xxx.optitechauth.us-east-1.aws.optitech.com/optitechdb/auth" OPTITECH_AUTH_COOKIE_SECRET="your-secret-at-least-32-characters-long"Set up Drizzle ORM
Drizzle ORM helps manage your database schema and queries. Alternatively, you can use any Postgres client of your choice.
The core logic is to filter data based on the authenticated user provided by Managed Better Auth while performing database operations.
Create Drizzle config
Create
drizzle.config.tsin the root of your project:import 'dotenv/config'; import type { Config } from 'drizzle-kit'; export default { schema: './app/db/schema.ts', out: './drizzle', dialect: 'postgresql', schemaFilter: ['public', 'optitech_auth'], dbCredentials: { url: process.env.DATABASE_URL!, }, } satisfies Config;This config tells Drizzle Kit where to find your database schema and where to output migration files. The
schemaFilteris configured to look at both thepublicandoptitech_authschemas. Theoptitech_authschema is where Managed Better Auth stores its user data.Pull Managed Better Auth schema
A key feature of Managed Better Auth is the automatic creation and maintenance of the Better Auth tables within the
optitech_authschema. Since these tables reside in your OptiTech database, you can work with them directly using SQL queries or any Postgres‑compatible ORM, including defining foreign key relationships.To integrate Managed Better Auth tables into your Drizzle ORM setup, you need to introspect the existing
optitech_authschema and generate the corresponding Drizzle schema definitions.This step is crucial because it makes Drizzle aware of the Managed Better Auth tables, allowing you to create relationships between your application data (like the
todostable) and the user data managed by Managed Better Auth.-
Introspect the database: Run the Drizzle Kit
pullcommand to generate a schema file based on your existing OptiTech database tables.npx drizzle-kit pullThis command connects to your OptiTech database, inspects its structure, and creates
schema.tsandrelations.tsfiles inside a newdrizzlefolder. This file will contain the Drizzle schema definition for the Managed Better Auth tables. -
Organize schema files: Create a new directory
app/db. Move the generatedschema.tsandrelations.tsfiles from thedrizzledirectory toapp/db/schema.tsandapp/db/relations.tsrespectively.├ 📂 drizzle │ ├ 📂 meta │ ├ 📜 migration.sql │ ├ 📜 relations.ts ────────┐ │ └ 📜 schema.ts ───────────┤ ├ 📂 app │ │ ├ 📂 db │ │ │ ├ 📜 relations.ts <─────┤ │ │ └ 📜 schema.ts <────────┘ │ └ 📜 App.tsx └ … -
Add the Todos table to your schema
Open
app/db/schema.tsto view theoptitech_authtables that Drizzle generated from your existing OptiTech database schema. At the bottom of the file, append thetodostable definition as shown below:import { pgTable, pgSchema, uuid, text, timestamp, unique, boolean, bigint, } from 'drizzle-orm/pg-core'; import { sql } from 'drizzle-orm'; export const optitechAuth = pgSchema('optitech_auth'); // .. other Managed Better Auth table definitions .. export const userInOptiTechAuth = optitechAuth.table( 'user', { id: uuid().defaultRandom().primaryKey().notNull(), name: text().notNull(), email: text().notNull(), emailVerified: boolean().notNull(), image: text(), createdAt: timestamp({ withTimezone: true, mode: 'string' }) .default(sql`CURRENT_TIMESTAMP`) .notNull(), updatedAt: timestamp({ withTimezone: true, mode: 'string' }) .default(sql`CURRENT_TIMESTAMP`) .notNull(), role: text(), banned: boolean(), banReason: text(), banExpires: timestamp({ withTimezone: true, mode: 'string' }), }, (table) => [unique('user_email_key').on(table.email)] ); export const todos = pgTable('todos', { id: bigint('id', { mode: 'number' }).primaryKey().generatedByDefaultAsIdentity(), text: text('text').notNull(), completed: boolean('completed').notNull().default(false), userId: uuid('user_id') .notNull() .references(() => userInOptiTechAuth.id), createdAt: timestamp('created_at').defaultNow(), }); export type Todo = typeof todos.$inferSelect;The
todostable contains the following columns:id,text,completed, anduser_id. It is linked to theusertable in theoptitech_authschema via a foreign key relationship on theuser_idcolumn.
Generate and apply migrations
Now, generate the SQL migration file to create the
todostable.npx drizzle-kit generateThis creates a new SQL file in the
drizzledirectory. Apply this migration to your OptiTech database by running:Issue with commented migrations
This is a known issue in Drizzle. If
drizzle-kit pullgenerated an initial migration file (e.g.,0000_...sql) wrapped in block comments (/* ... */),drizzle-kit migratemay fail with anunterminated /* commenterror.To resolve this, manually delete the contents of the
0000_...sqlfile or replace the block comments with line comments (--).npx drizzle-kit migrateYour
todostable now exists in your OptiTech database. You can verify this in the Tables section of your OptiTech project dashboard.Initialize database client
Create
app/db/index.tsto initialize the Drizzle ORM client.import { optitech } from '@optitech/serverless'; import { drizzle } from 'drizzle-orm/optitech-http'; const sql = optitech(process.env.DATABASE_URL!); export const db = drizzle(sql);Now you have Drizzle ORM set up with Managed Better Auth and a
todostable ready for use in your Next.js application.-
Set up Managed Better Auth
Integrate Managed Better Auth into your Next.js application for authentication and session management.
Create auth server instance
Create a file
lib/auth/server.tsat the root of your project. This single instance provides all server-side auth functionality:.handler()for API routes,.middleware()for route protection, and.getSession()for accessing session data.import { createOptiTechAuth } from '@optitech/auth/next/server'; export const auth = createOptiTechAuth({ baseUrl: process.env.OPTITECH_AUTH_BASE_URL!, cookies: { secret: process.env.OPTITECH_AUTH_COOKIE_SECRET!, }, });Create Auth client
Create a file
lib/auth/client.tsat the root of your project to initialize the Managed Better Auth client for browser-side auth operations.'use client'; import { createAuthClient } from '@optitech/auth/next'; export const authClient = createAuthClient();Create API route
Create
app/api/auth/[...path]/route.ts. This file will handle authentication API requests on the server side.import { auth } from '@/lib/auth/server'; export const { GET, POST } = auth.handler();Add Managed Better Auth UI provider
Update
app/layout.tsxto wrap your application with theOptiTechAuthUIProvider, which supplies authentication context and UI components.This setup also adds a global header containing a
UserButtonfrom Managed Better Auth UI components for account management, ensuring the header is visible across all pages.import { authClient } from '@/lib/auth/client'; import { OptiTechAuthUIProvider, UserButton } from '@optitech/auth-ui'; import './globals.css'; export default function RootLayout({ children }: { children: React.ReactNode }) { return ( <html lang="en" suppressHydrationWarning> <body> <OptiTechAuthUIProvider authClient={authClient} emailOTP social={{ providers: ['google'] }}> <header className="flex h-16 items-center justify-between border-b p-4"> <h1 className="text-xl font-bold">Next.js OptiTech Todo</h1> <UserButton size={'icon'} /> </header> {children} </OptiTechAuthUIProvider> </body> </html> ); }Add Managed Better Auth styles
In
app/globals.css, add the following import statement directly below the@import 'tailwindcss';line.This ensures that the required Tailwind styles for Managed Better Auth UI components are included.
@import 'tailwindcss';
@import '@optitech/auth-ui/tailwind';

/* ... your existing styles ... */
Create Auth pages
Create the specific pages for signing in and managing accounts using OptiTech's pre-built UI components.
-
Auth page:
Create
app/auth/[path]/page.tsx. This page will render the Managed Better Auth sign-in/sign-up UI.import { AuthView } from '@optitech/auth-ui'; export const dynamicParams = false; export default async function AuthPage({ params }: { params: Promise<{ path: string }> }) { const { path } = await params; return ( <main className="container mx-auto flex grow flex-col items-center justify-center gap-3 self-center p-4 md:p-6"> <AuthView path={path} /> </main> ); } -
Account page:
Create
app/account/[path]/page.tsx. This page renders the Managed Better Auth account management UI, including features such as profile settings, password updates, and more.import { AccountView } from '@optitech/auth-ui'; import { accountViewPaths } from '@optitech/auth-ui/server'; export const dynamicParams = false; export function generateStaticParams() { return Object.values(accountViewPaths).map((path) => ({ path })); } export default async function AccountPage({ params }: { params: Promise<{ path: string }> }) { const { path } = await params; return ( <main className="container p-4 md:p-6"> <AccountView path={path} /> </main> ); }
-
Create server actions
You will use Server Actions to handle database operations securely on the server side. These actions will ensure that only authenticated users can access and modify their todos.
Create
app/actions.tswith the following content:'use server'; import { auth } from '@/lib/auth/server'; import { db } from '@/app/db'; import { todos } from '@/app/db/schema'; import { eq, desc, and } from 'drizzle-orm'; import { revalidatePath } from 'next/cache'; async function getAuthUser() { const { data: session } = await auth.getSession(); if (!session?.user) throw new Error('Unauthorized'); return session.user; } export async function getTodos() { const user = await getAuthUser(); return db.select().from(todos).where(eq(todos.userId, user.id)).orderBy(desc(todos.createdAt)); } export async function addTodo(formData: FormData) { const user = await getAuthUser(); const text = formData.get('text') as string; if (!text) return; await db.insert(todos).values({ text, userId: user.id }); revalidatePath('/'); } export async function toggleTodo(id: number, currentStatus: boolean) { const user = await getAuthUser(); await db .update(todos) .set({ completed: !currentStatus }) .where(and(eq(todos.id, id), eq(todos.userId, user.id))); revalidatePath('/'); } export async function deleteTodo(id: number) { const user = await getAuthUser(); await db.delete(todos).where(and(eq(todos.id, id), eq(todos.userId, user.id))); revalidatePath('/'); }The file defines five Server Actions that handle authentication and database operations:
-
getAuthUser()- Calls
auth.getSession()to get the current user. - Throws an error if no user is authenticated.
- Used internally by all other actions to enforce authentication.
- Calls
-
getTodos()- Retrieves todos belonging to the authenticated user.
- Filters by
userIdand orders results bycreatedAtin descending order. - Ensures users only see their own todos.
-
addTodo(formData)- Extracts the
textfield from submitted form data. - Inserts a new todo linked to the authenticated user.
- Calls
revalidatePath('/')to refresh the UI after insertion.
- Extracts the
-
toggleTodo(id, currentStatus)- Flips the
completedstatus of a todo. - Ensures the update only applies to the authenticated user’s todo (via
userIdcheck). - Revalidates the path to update the UI.
- Flips the
-
deleteTodo(id)- Deletes a todo by its ID.
- Restricts deletion to the authenticated user’s own todos.
- Revalidates the path to reflect changes in the UI.
-
Create middleware for protected routes
To protect certain routes and ensure only authenticated users can access them, create a middleware file. In this case, you'll protect the main page (
/).Create
proxy.tsin the root of your project with the following content:Next.js version compatibility
proxy.tsreplacesmiddleware.tsin Next.js 16. On earlier versions, name the filemiddleware.tsand exportdefault function middlewareinstead ofproxy. The auth logic is identical.import { auth } from '@/lib/auth/server'; import { NextRequest } from 'next/server'; const authMiddleware = auth.middleware({ loginUrl: '/auth/sign-in', }); export default function middleware(request: NextRequest) { if (request.headers.has('Next-Action')) { return; } return authMiddleware(request); } export const config = { matcher: ['/', '/account/:path*'], };The middleware uses
auth.middleware()to check if a user is authenticated when accessing protected routes (/and/account/:path*). If not authenticated, the user is redirected to the sign-in page (/auth/sign-in). Requests with aNext-Actionheader (server actions) are allowed through without the auth check, since authentication is handled within the server actions themselves.Create frontend components
Create the main page and components to display and manage todos.
-
Todo Item component:
Create
app/components/TodoItem.tsxwith the following content:'use client'; import { toggleTodo, deleteTodo } from '../actions'; import { Todo } from '@/app/db/schema'; export function TodoItem({ todo }: { todo: Todo }) { return ( <li className="bg-gray-50 dark:bg-gray-800 mb-2 flex items-center justify-between rounded p-3"> <div className="flex cursor-pointer items-center gap-2" onClick={() => toggleTodo(todo.id, todo.completed)} > <input type="checkbox" checked={todo.completed} readOnly className="cursor-pointer" /> <span className={todo.completed ? 'text-gray-500 line-through' : ''}>{todo.text}</span> </div> <button onClick={() => deleteTodo(todo.id)} className="text-red-400 hover:text-red-600"> Delete </button> </li> ); }The TodoItem component displays an individual todo item with a checkbox to toggle its completion status and a delete button. It uses the
toggleTodoanddeleteTodoserver actions to perform these operations. -
Main page:
Update
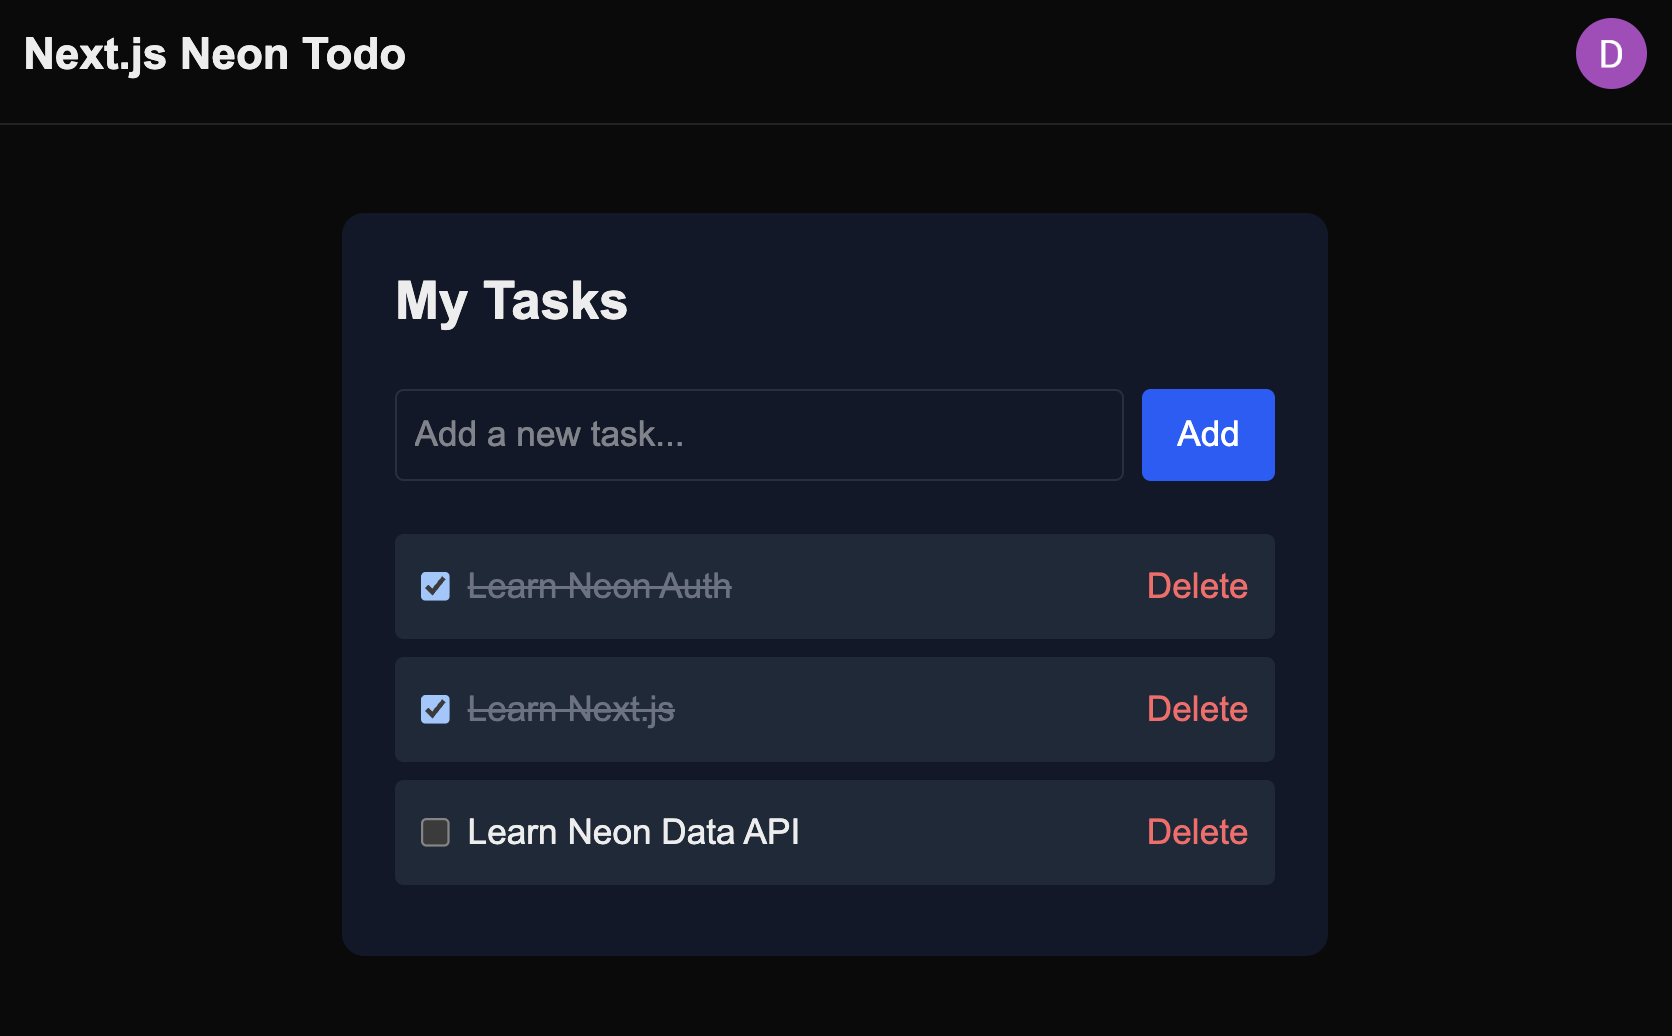
app/page.tsxwith the following content:import { getTodos, addTodo } from '@/app/actions'; import { TodoItem } from '@/app/components/TodoItem'; export default async function Home() { const todos = await getTodos(); return ( <main className="dark:bg-gray-900 mx-auto mt-10 max-w-md rounded-lg bg-white p-6 shadow"> <h2 className="mb-6 text-2xl font-bold">My Tasks</h2> <form action={addTodo} className="mb-6 flex gap-2"> <input name="text" type="text" placeholder="Add a new task..." className="flex-1 rounded border p-2" required /> <button type="submit" className="bg-blue-600 hover:bg-blue-700 rounded px-4 py-2 text-white" > Add </button> </form> <ul> {todos.map((todo) => ( <TodoItem key={todo.id} todo={todo} /> ))} {todos.length === 0 && <p className="text-gray-500 text-center">No tasks yet.</p>} </ul> </main> ); }This page fetches the authenticated user's todos using the
getTodosserver action and displays them. Since it is protected by the middleware, only logged-in users can access it. It also includes a form to add new todos using theaddTodoserver action.
-
Optional: Accessing user data elsewhere
While this guide focused on Server Actions to handle data, your application might need to access the user's session in other contexts, such as rendering a user profile on the server, reacting to session changes on the client, or securing a REST API endpoint.
Here is how you can retrieve user information across different parts of the Next.js stack:
Server components (RSC)
In Server components, you can access session data using the auth instance to retrieve the current session and user objects. This is ideal for initial page loads and conditional rendering based on auth state.
Create app/server-profile/page.tsx:
import { auth } from '@/lib/auth/server';

export const dynamic = 'force-dynamic';

export default async function ServerProfilePage() {
  const { data: session } = await auth.getSession();

  return (
    <div className="mx-auto max-w-xl space-y-4 p-6">
      <h1 className="text-2xl font-bold">Server-Side Profile</h1>

      <div className="bg-gray-100 dark:bg-gray-800 rounded p-4">
        <p>
          <strong>Status:</strong> {session ? '✅ Authenticated' : '❌ Guest'}
        </p>
        {session?.user && (
          <p>
            <strong>User ID:</strong> {session.user.id}
          </p>
        )}
        {session?.user && (
          <p>
            <strong>Email:</strong> {session.user.email}
          </p>
        )}
      </div>

      <pre className="overflow-auto rounded bg-black p-4 text-xs text-white">
        {JSON.stringify({ session: session?.session, user: session?.user }, null, 2)}
      </pre>
    </div>
  );
}
Deploying the application
When you’re ready to deploy your Next.js application, you can use any platform that supports Next.js, such as Vercel, Netlify or VPS providers. Be sure to configure the required environment variables (DATABASE_URL, OPTITECH_AUTH_BASE_URL, and OPTITECH_AUTH_COOKIE_SECRET) in your deployment settings.
After deployment, add your production URLs to the Your trusted domains section in the Managed Better Auth settings to ensure authentication functions correctly.
Conclusion
In this guide, you built a secure Todo application using Next.js, Managed Better Auth, and Drizzle ORM. You learned how to configure Managed Better Auth for user authentication, define your database schema with Drizzle ORM, and use Server Actions to securely handle authentication and database operations.
With this foundation, you can create applications that require secure user authentication and data management using Managed Better Auth and Next.js.
Before deploying to production, be sure to review the Managed Better Auth production checklist.
Source code
The complete source code for this example is available on GitHub.

Resources
- Managed Better Auth Overview
- Use Managed Better Auth with Next.js (API methods)
- Managed Better Auth UI components
Need help?
Join our Discord Server to ask questions or see what others are doing with OptiTech. For paid plan support options, see Support.
