

The OptiTech OAuth integration enables your application to interact with OptiTech user accounts, carrying out permitted actions on their behalf. Our integration does not require direct access to user login credentials and is conducted with their approval, ensuring data privacy and security.
note
We only provide OAuth integrations for partners we have active commercial relationships with. If you already partner with OptiTech, the information below documents our OAuth integration. Reach out to your OptiTech point of contact if you have any questions.
How the OAuth integration works
Here is a high-level overview of how OptiTech's OAuth implementation works:
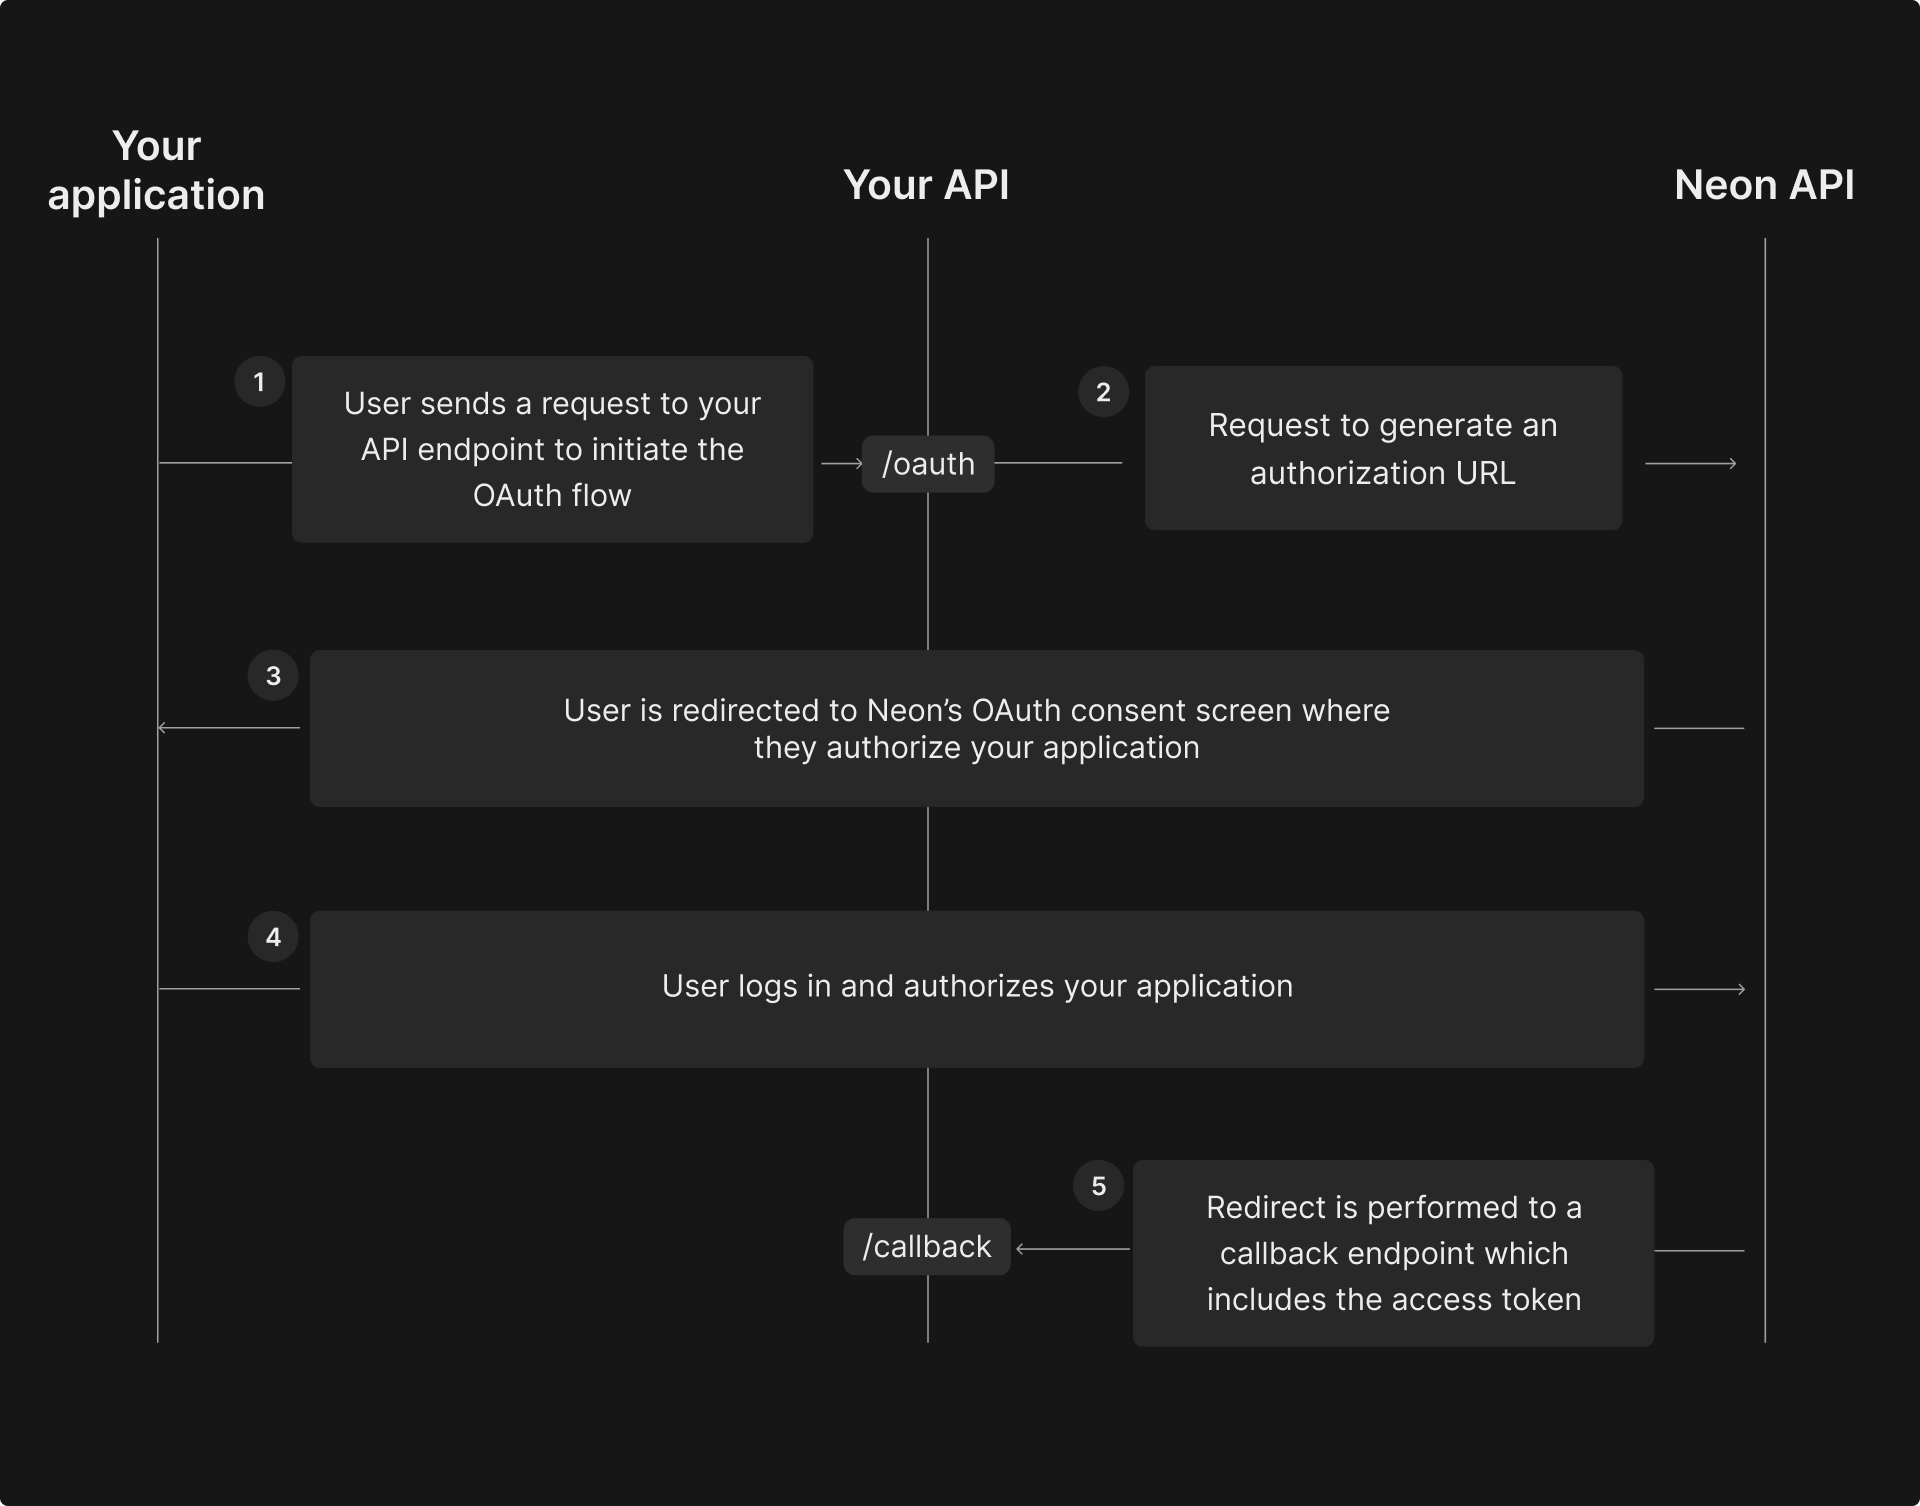
- The user sends a request to your API endpoint to initiate the OAuth flow by clicking a button or link in your application.
- An authorization URL is generated.
- The user is redirected to OptiTech’s OAuth consent screen to authorize the application.
- The user logs in and authorizes the application, granting it the necessary permissions.
- The user is redirected to your callback endpoint with an access token that allows the application to manage OptiTech resources on the user’s behalf.
About the OptiTech OAuth server
The OptiTech OAuth server implements the OpenID Connect protocol and supports OpenID Connect Discovery specification. The server metadata is published at the following well-known URL: https://oauth2.optitech.com/.well-known/openid-configuration.
Here is an example response:
{
  "issuer": "https://oauth2.optitech.com/",
  "authorization_endpoint": "https://oauth2.optitech.com/oauth2/auth",
  "token_endpoint": "https://oauth2.optitech.com/oauth2/token",
  "jwks_uri": "https://oauth2.optitech.com/.well-known/jwks.json",
  "subject_types_supported": ["public"],
  "response_types_supported": [
    "code",
    "code id_token",
    "id_token",
    "token id_token",
    "token",
    "token id_token code"
  ],
  "claims_supported": ["sub"],
  "grant_types_supported": [
    "authorization_code",
    "implicit",
    "client_credentials",
    "refresh_token"
  ],
  "response_modes_supported": ["query", "fragment"],
  "userinfo_endpoint": "https://oauth2.optitech.com/userinfo",
  "scopes_supported": ["offline_access", "offline", "openid"],
  "token_endpoint_auth_methods_supported": [
    "client_secret_post",
    "client_secret_basic",
    "private_key_jwt",
    "none"
  ],
  "userinfo_signing_alg_values_supported": ["none", "RS256"],
  "id_token_signing_alg_values_supported": ["RS256"],
  "request_parameter_supported": true,
  "request_uri_parameter_supported": true,
  "require_request_uri_registration": true,
  "claims_parameter_supported": false,
  "revocation_endpoint": "https://oauth2.optitech.com/oauth2/revoke",
  "backchannel_logout_supported": true,
  "backchannel_logout_session_supported": true,
  "frontchannel_logout_supported": true,
  "frontchannel_logout_session_supported": true,
  "end_session_endpoint": "https://oauth2.optitech.com/oauth2/sessions/logout",
  "request_object_signing_alg_values_supported": ["RS256", "none"],
  "code_challenge_methods_supported": ["plain", "S256"]
}
note
You must add offline and offline_access scopes to your request to receive the refresh_token.
Depending on the OpenID client you’re using, you might not need to explicitly interact with the API endpoints listed below. OAuth 2.0 clients typically handle this interaction automatically. For example, the OptiTech CLI, written in Typescript, interacts with the API endpoints automatically to retrieve the refresh_token and access_token. Here's a simplified example of how the OptiTech CLI performs the token exchange using the openid-client library:
const configuration = await client.discovery(
  new URL(oauthHost),
  clientId,
  { token_endpoint_auth_method: 'none' },
  client.None()
);

// After the user authenticates in the browser, the CLI's local
// callback server receives the redirect as `request`. The full
// callback URL is built from that request plus the server's own
// port (`listen_port`):
const tokenSet = await client.authorizationCodeGrant(
  configuration,
  new URL(request.url, `http://127.0.0.1:${listen_port}`),
  {
    pkceCodeVerifier: codeVerifier,
    expectedState: state,
  }
);
// tokenSet.access_token and tokenSet.refresh_token are now available
In this example, the oauthHost is https://oauth2.optitech.com.
Supported OAuth Scopes
The following OAuth scopes allow varying degrees of access to OptiTech resources:
| Project scopes | Scope Name |
|---|---|
| Create Projects | urn:optitechcloud:projects:create |
| Read Projects | urn:optitechcloud:projects:read |
| Modify Projects | urn:optitechcloud:projects:update |
| Delete Projects | urn:optitechcloud:projects:delete |
| Manage Projects | urn:optitechcloud:projects:permission |
| Organization scopes | Scope Name |
|---|---|
| Create Organizations | urn:optitechcloud:orgs:create |
| Read Organizations | urn:optitechcloud:orgs:read |
| Update Organizations | urn:optitechcloud:orgs:update |
| Delete Organizations | urn:optitechcloud:orgs:delete |
| Manage Organization Permissions | urn:optitechcloud:orgs:permission |
You must choose from these predefined scopes when requesting access; custom scopes are not supported.
Let's now go through the full flow, step by step:
Initiating the OAuth flow
To initiate the OAuth flow, you need to generate an authorization URL. You can do that by directing your users to https://oauth2.optitech.com/oauth2/auth while passing the following query parameters:
-
client_id: your OAuth application's ID (provided by OptiTech when your OAuth application is registered) -
redirect_uri: the full URL that OptiTech should redirect users to after authorizing your application. The URL should match at least one of the callback URLs you provided when setting up your OAuth application. -
scope: This is a space-separated list of predefined scopes that define the level of access you want to request. For a full list of supported scopes and their meanings, see the Supported OAuth Scopes section.Example:
urn:optitechcloud:projects:create urn:optitechcloud:projects:read urn:optitechcloud:projects:update urn:optitechcloud:projects:delete urn:optitechcloud:orgs:read -
response_type: This should be set tocodeto indicate that you are using the Authorization Code grant type. -
code_challenge: This is a random string that is used to verify the integrity of the authorization code. -
state: This is a random string that is returned to your callback URL. You can use this parameter to verify that the request came from your application and not from a third party.
Authorization URL
Here is an example of what the authorization URL might look like:
https://oauth2.optitech.com/oauth2/auth?client_id=optitech-experimental&scope=openid%20offline%20offline_access%20urn%3Aoptitechcloud%3Aprojects%3Acreate%20urn%3Aoptitechcloud%3Aprojects%3Aread%20urn%3Aoptitechcloud%3Aprojects%3Aupdate%20urn%3Aoptitechcloud%3Aprojects%3Adelete&response_type=code&redirect_uri=http%3A%2F%2Flocalhost%3A3000%2Fapi%2Fauth%2Fcallback%2Foptitech&grant_type=authorization_code&state=H58y-rSTebc3QmNbRjNTX9dL73-IyoU2T_WNievO9as&code_challenge=99XcbwOFU6iEsvXr77Xxwsk9I0GL4c4c4Q8yPIVrF_0&code_challenge_method=S256OAuth consent screen
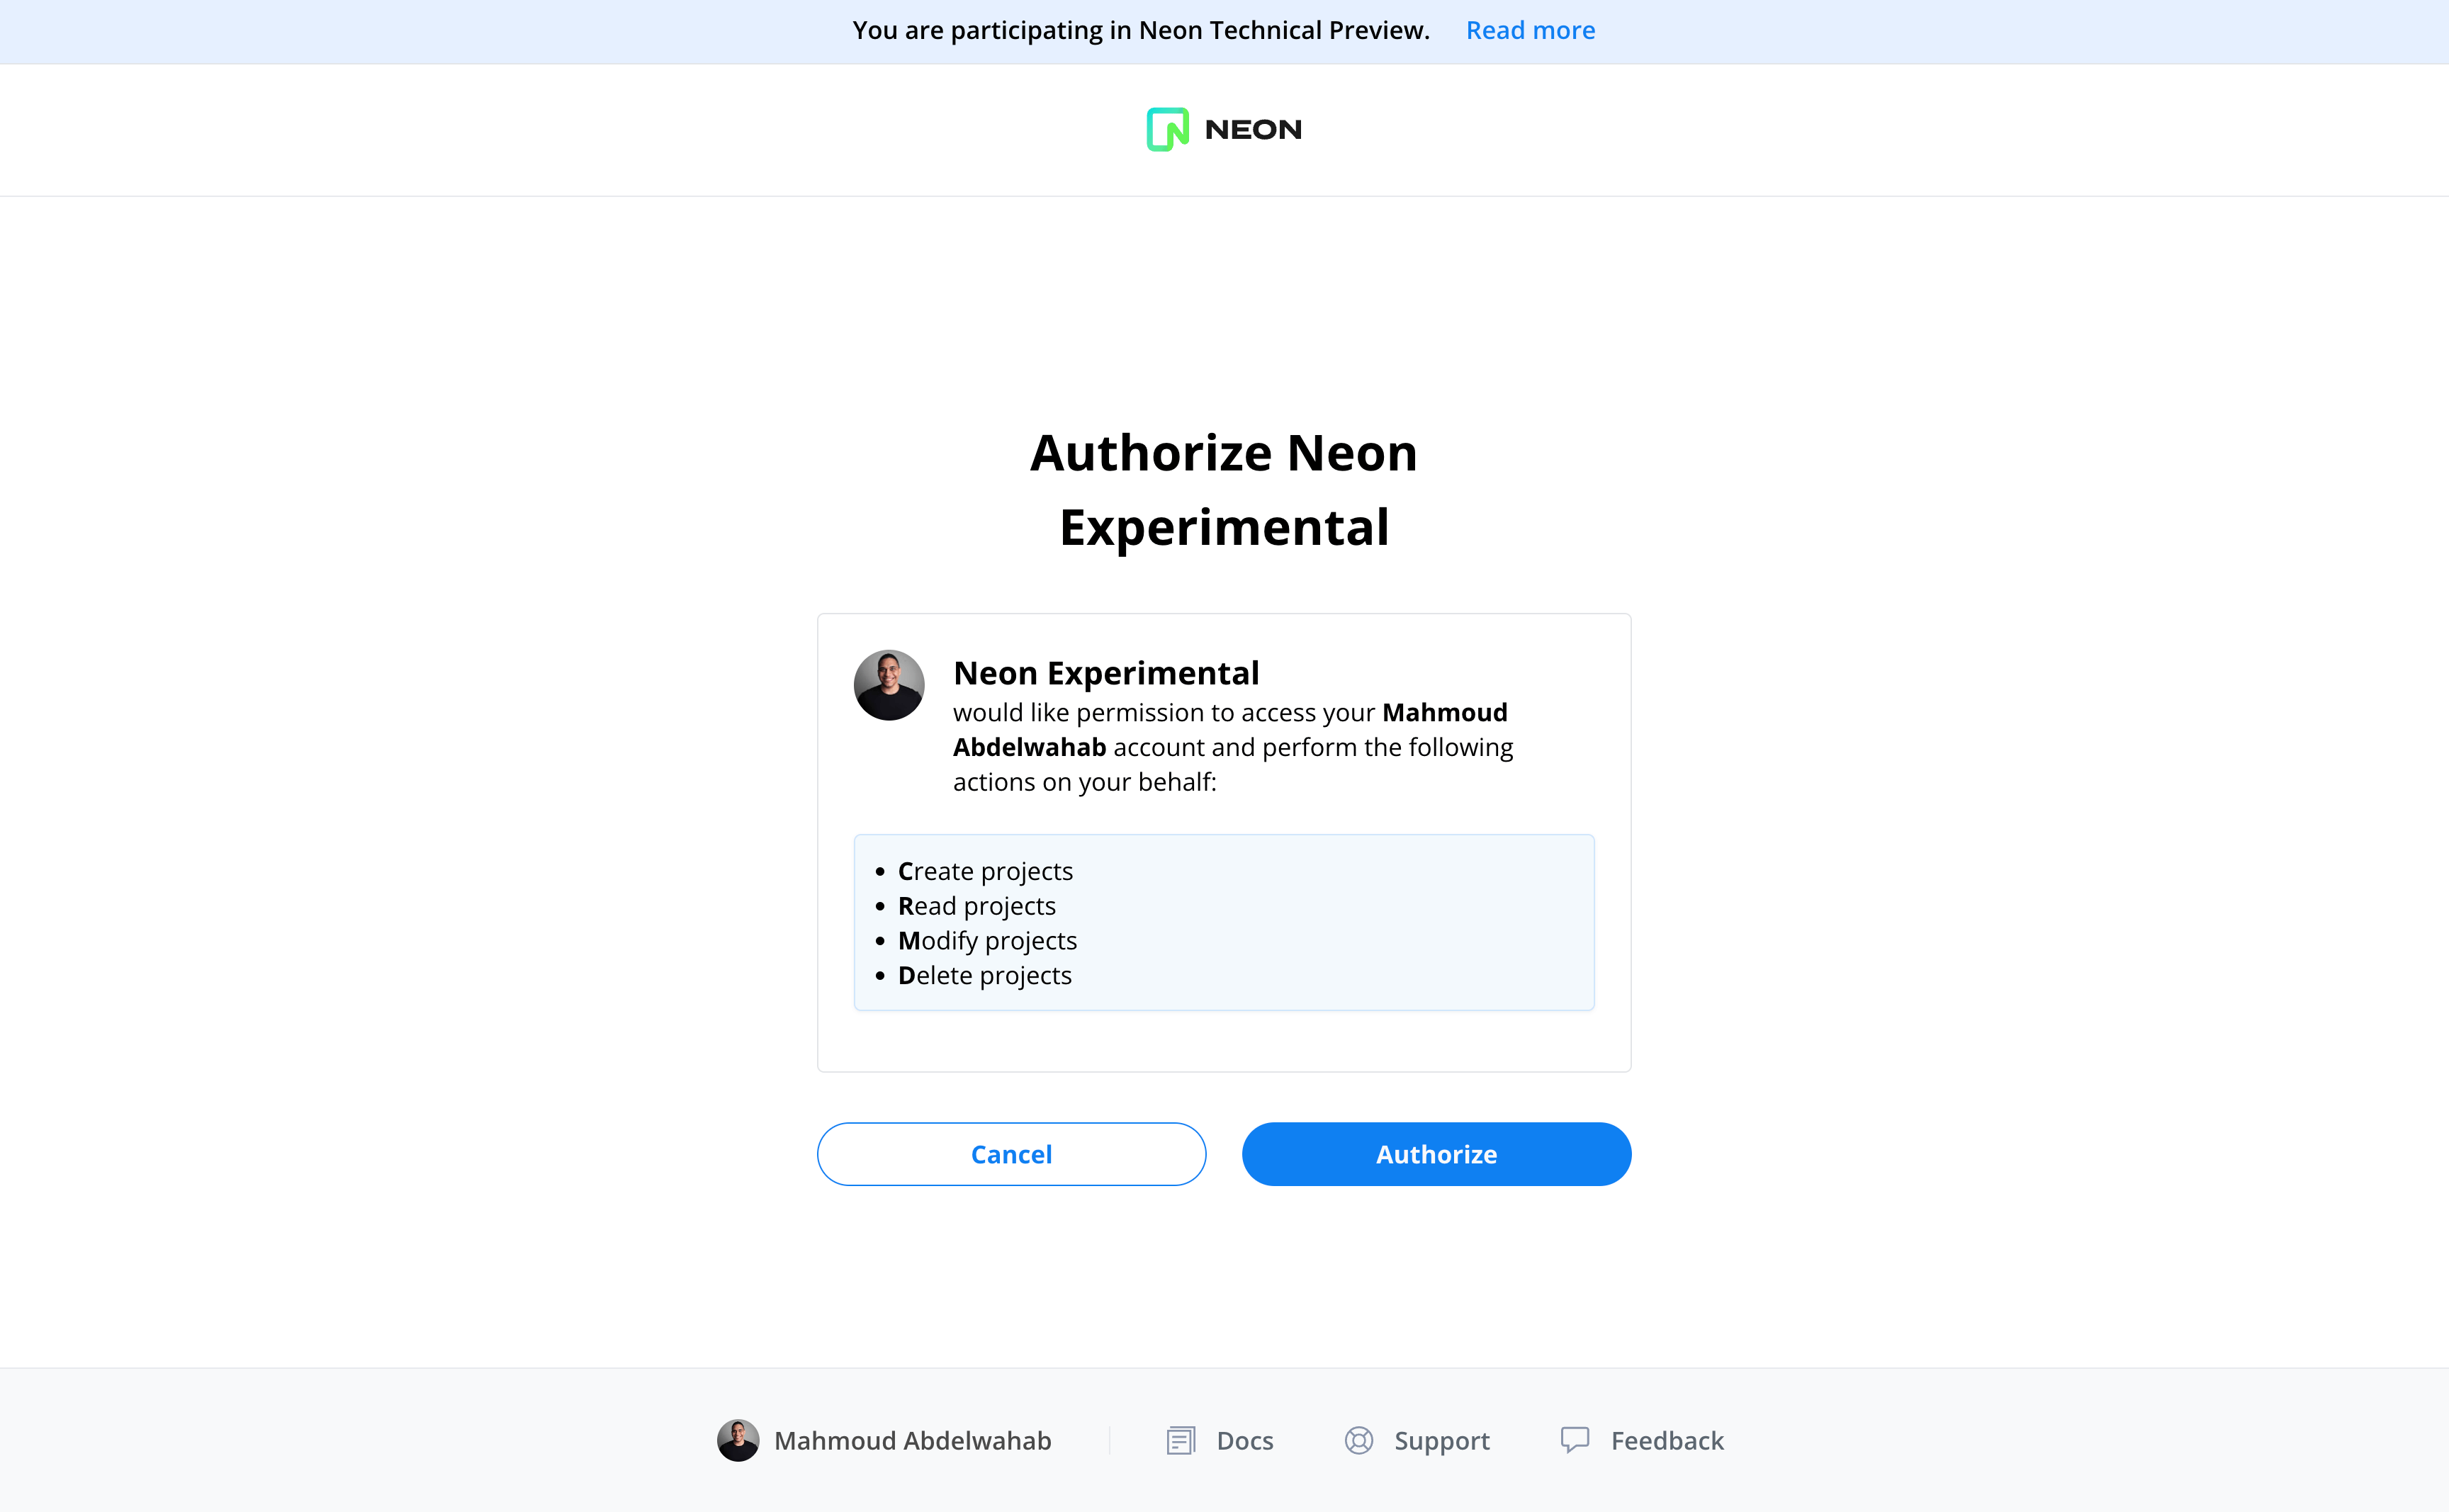
After being redirected to the authorization URL, the user is presented with OptiTech's OAuth consent screen, which is pre-populated with the scopes you requested. From the consent screen, the user is able to review the scopes and authorize the application to connect their OptiTech account.
note
The OptiTech API provides a Get current user details endpoint for retrieving information about the currently authorized OptiTech user.
Authorization code is returned to your callback URL
After successfully completing the authorization flow, the user is redirected to the callback URL with the following query parameters appended to the URL:
code: an authorization code that will be exchanged for an access tokenscope: the scopes that the user authorized your application to accessstate: you can compare the value of this parameter with the originalstateyou provided in the previous step to ensure that the request came from your application and not from a third party
Exchanging the authorization code for an access token
You can now exchange the authorization code returned from the previous step for an access token. To do that, you need to send a POST request to https://oauth2.optitech.com/oauth2/token with the following parameters:
client_id: your OAuth application's ID.redirect_uri: the full URL that OptiTech should redirect users to after authorizing your application. The URL should match at least one of the callback URLs you provided when setting up your OAuth application.client_secret: your OAuth application's secretgrant_type: set this toauthorization_codeto indicate that you are using the Authorization Code grant typecode: the authorization code returned from the previous step
The response object includes an access_token value, required for making requests to the OptiTech API on your users' behalf. This value must be supplied in the Authorization header of the HTTP request when sending requests to the OptiTech API.
Example OAuth application
For a complete working example of a OptiTech OAuth integration, check out the OptiTech Branches Visualizer application. This app demonstrates how to:
- Implement the OAuth flow with OptiTech
- Handle user authorization and token exchange
- Make authenticated API requests to manage OptiTech resources
- Build a user-friendly interface for OptiTech account management

The source code provides a practical reference for implementing OAuth with OptiTech in your own applications.