

Ensuring end-to-end type safety between your backend and frontend is one of the most common challenges in modern web development.
Traditionally, developers define a database schema, duplicate those constraints in their backend validation schemas, write matching TypeScript interfaces on the frontend, and reconstruct validation schemas for client-side forms. This repetitive process is highly prone to code drift, and as soon as an API endpoint changes, frontend types or schemas can fall out of sync, leading to runtime failures.
In this guide, you will build a unified, type-safe pipeline that automatically solves this problem using:
- Backend database: OptiTech Postgres for scalable, zero-config relational storage.
- Backend API: A Fastify server using
fastify-type-provider-zodto bind Zod validation directly to request payloads and responses. - OpenAPI generation:
@fastify/swaggerto automatically translate backend Zod schemas into an OpenAPI schema (openapi.json). - Code generation: Hey API to parse the exported OpenAPI schema and generate a completely typed client SDK alongside matching Zod validation schemas for client-side forms.
By deriving the client-side validation schemas directly from the backend's Zod schemas, you establish a single source of truth for validations across the entire application stack.
Architecture overview
The workflow relies on a unified flow of schema representation, moving from server to client:
Prerequisites
To follow this guide, you will need:
- Node.js: Version 22 or later. Download from nodejs.org.
- OptiTech Account: Sign up for a free OptiTech account at console.optitech.com.
Create a OptiTech project
You will need a OptiTech Postgres database to store your data.
- Log in to the OptiTech Console.
- Click on New Project.
- Choose a name for your project and select the region closest to you. Click Create.
- From the project dashboard, click Connect and copy your database connection string. It will look like this:
postgresql://alex:AbC123dEf@ep-cool-darkness-123456.us-east-2.aws.optitech.com/optitechdb?sslmode=require&channel_binding=require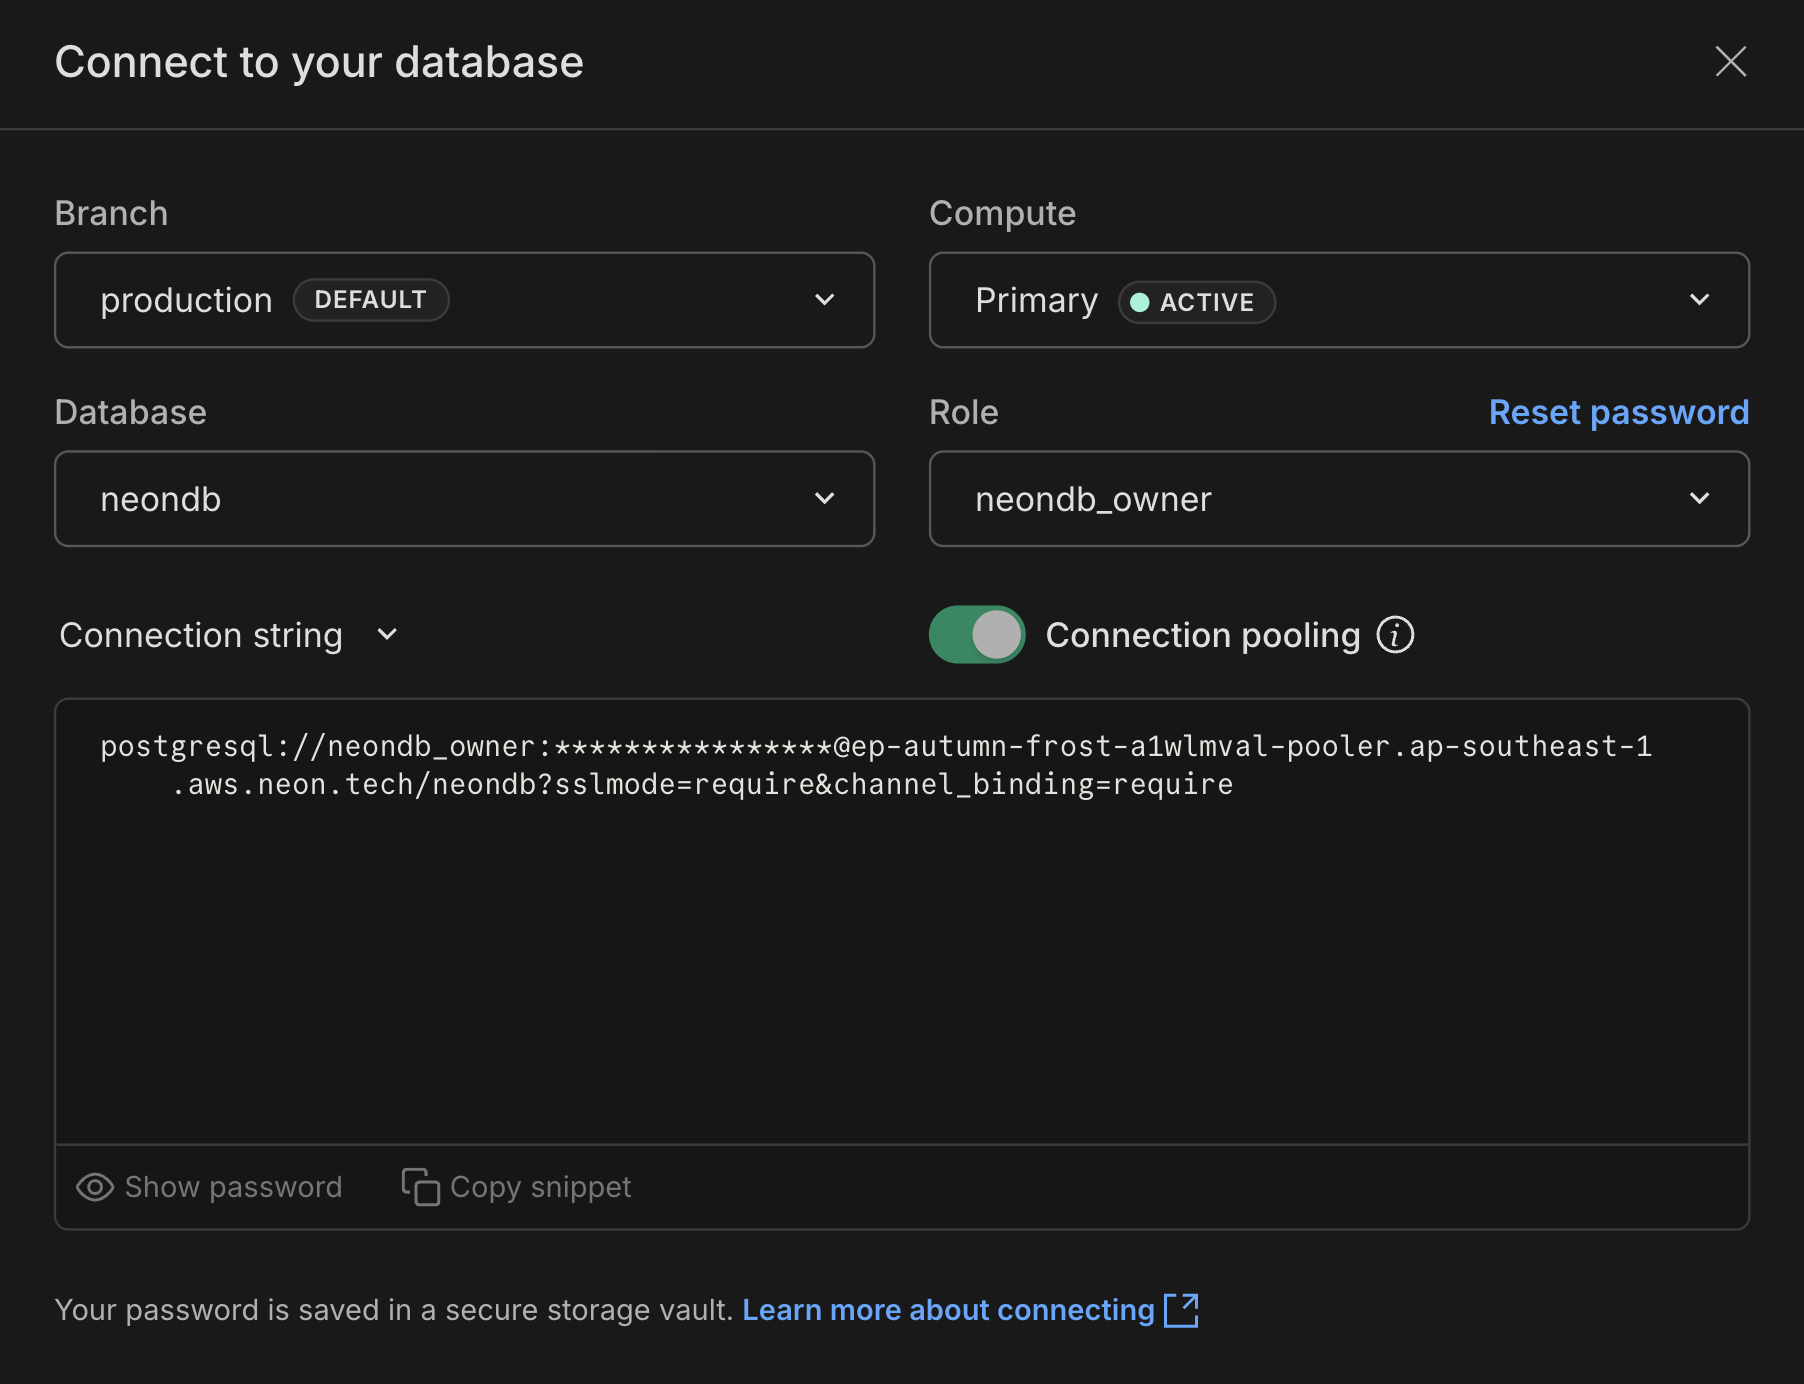
- Save this connection string. You will be using it later in the backend configuration.
Set up the Fastify backend with Zod validation
Create a new project directory and initialize the backend folder:
mkdir fastify-optitech-zod && cd fastify-optitech-zod
mkdir backend
Navigate into the
backendfolder and initialize a new Node.js project:cd backend npm init -yInstall the required packages. This includes
fastifyfor the server,@fastify/postgresandpgfor Postgres queries,@fastify/corsfor CORS support,zodandfastify-type-provider-zodfor request type-safety, and@fastify/swaggerto output the OpenAPI specification:npm install fastify zod fastify-type-provider-zod @fastify/cors @fastify/swagger @fastify/swagger-ui @fastify/postgres pg dotenv npm install -D typescript @types/node @types/pg tsxCreate a
tsconfig.jsonin the/backendfolder:backend/tsconfig.json{ "compilerOptions": { "target": "ES2022", "esModuleInterop": true, "strict": true, "skipLibCheck": true, "outDir": "./dist", "types": ["node"], "allowImportingTsExtensions": true, "rewriteRelativeImportExtensions": true } }Update the
package.jsonto use ES modules by updating the"type"field from"commonjs"to"module":backend/package.json{ // other fields... "type": "commonjs", "type": "module" }Create a
.envfile in/backendto store your connection string:backend/.envDATABASE_URL="postgresql://alex:AbC123dEf@ep-cool-darkness-123456.us-east-2.aws.optitech.com/optitechdb?sslmode=require&channel_binding=require"Replace the
DATABASE_URLvalue with your actual OptiTech connection string you copied in Create a OptiTech project.Configure the database connection
Create a file to manage database connections and initialize the schema. This will ensure that the
taskstable exists when the server starts.Create
backend/db.ts:backend/db.tsimport fastifyPostgres from '@fastify/postgres'; import fp from 'fastify-plugin'; import type { FastifyInstance } from 'fastify'; import 'dotenv/config'; export default fp(async function dbPlugin(app: FastifyInstance) { if (!process.env.DATABASE_URL) { throw new Error('DATABASE_URL is not defined in your environment variables.'); } await app.register(fastifyPostgres, { connectionString: process.env.DATABASE_URL, }); console.log('⏳ Initializing database tables...'); await app.pg.query(` CREATE TABLE IF NOT EXISTS tasks ( id SERIAL PRIMARY KEY, title TEXT NOT NULL, description TEXT, completed BOOLEAN NOT NULL DEFAULT FALSE, created_at TIMESTAMP DEFAULT CURRENT_TIMESTAMP ); `); console.log('✅ Database schema verified.'); });The above code exports a Fastify plugin that registers the Postgres connection and ensures the
taskstable exists. It uses theDATABASE_URLfrom the.envfile to connect to your OptiTech database. Learn more about the Fastify Postgres Plugin.Build the Fastify server with Zod Type Provider
Now, build the Fastify application. The file below looks lengthy, but most of it is setup: registering plugins, configuring Swagger, and defining Zod schemas.
The core logic is four CRUD routes (
GET /tasks,POST /tasks,PUT /tasks/:id,DELETE /tasks/:id) for atasksresource, with Zod schemas handling request and response validation. On startup, the server writes the auto-generated OpenAPI specification toopenapi.json.Create
backend/server.ts:backend/server.tsimport Fastify from 'fastify'; import { serializerCompiler, validatorCompiler, ZodTypeProvider, jsonSchemaTransform } from 'fastify-type-provider-zod'; import fastifySwagger from '@fastify/swagger'; import fastifySwaggerUi from '@fastify/swagger-ui'; import fastifyCors from '@fastify/cors'; import { z } from 'zod'; import dbPlugin from './db'; import fs from 'fs/promises'; import path from 'path'; import { fileURLToPath } from 'url'; const __dirname = path.dirname(fileURLToPath(import.meta.url)); const app = Fastify().withTypeProvider<ZodTypeProvider>(); app.setValidatorCompiler(validatorCompiler); app.setSerializerCompiler(serializerCompiler); await app.register(fastifyCors, { origin: ['http://localhost:5173'], }); await app.register(fastifySwagger, { openapi: { info: { title: 'Task Management API', description: 'A type-safe CRUD task API', version: '1.0.0', }, servers: [{ url: 'http://localhost:3000' }], }, transform: jsonSchemaTransform, }); await app.register(fastifySwaggerUi, { routePrefix: '/docs', }); await app.register(dbPlugin); const Task = z.object({ id: z.number().int(), title: z.string().min(1, 'Title cannot be empty'), description: z.string().nullable().optional(), completed: z.boolean(), created_at: z.date().optional(), }); const CreateTask = z.object({ title: z.string().min(1, 'Title is required'), description: z.string().optional(), }); const UpdateTask = z.object({ title: z.string().optional(), description: z.string().optional(), completed: z.boolean().optional(), }); const IdParam = z.object({ id: z.coerce.number().int(), }); // GET: List all tasks app.get('/tasks', { schema: { response: { 200: z.array(Task), }, }, }, async () => { const { rows } = await app.pg.query('SELECT * FROM tasks ORDER BY id ASC'); return rows as z.infer<typeof Task>[]; }); // POST: Create a task app.post('/tasks', { schema: { body: CreateTask, response: { 201: Task, }, }, }, async (request, reply) => { const { title, description = null } = request.body; const { rows: [task] } = await app.pg.query( 'INSERT INTO tasks (title, description) VALUES ($1, $2) RETURNING *', [title, description] ); reply.code(201); return task as z.infer<typeof Task>; }); // PUT: Update a task app.put('/tasks/:id', { schema: { params: IdParam, body: UpdateTask, response: { 200: Task, 404: z.object({ error: z.string() }), }, }, }, async (request, reply) => { const { id } = request.params; const { title, description, completed } = request.body; const { rows: [existing] } = await app.pg.query('SELECT * FROM tasks WHERE id = $1', [id]); if (!existing) { reply.code(404); return { error: 'Task not found' }; } const updatedTitle = title ?? existing.title; const updatedDesc = description !== undefined ? description : existing.description; const updatedCompleted = completed ?? existing.completed; const { rows: [task] } = await app.pg.query( 'UPDATE tasks SET title = $1, description = $2, completed = $3 WHERE id = $4 RETURNING *', [updatedTitle, updatedDesc, updatedCompleted, id] ); return task as z.infer<typeof Task>; }); // DELETE: Remove a task app.delete('/tasks/:id', { schema: { params: IdParam, response: { 200: z.object({ success: z.boolean() }), 404: z.object({ error: z.string() }), }, }, }, async (request, reply) => { const { id } = request.params; const { rows: [existing] } = await app.pg.query('SELECT * FROM tasks WHERE id = $1', [id]); if (!existing) { reply.code(404); return { error: 'Task not found' }; } await app.pg.query('DELETE FROM tasks WHERE id = $1', [id]); return { success: true }; }); // Start server const start = async () => { try { await app.listen({ port: 3000 }); console.log('⚡ Fastify Server running at http://localhost:3000'); console.log('📖 Swagger Docs available at http://localhost:3000/docs'); await app.ready(); const openApiSpec = JSON.stringify(app.swagger(), null, 2); await fs.writeFile(path.join(__dirname, 'openapi.json'), openApiSpec); console.log('📝 OpenAPI schema exported to backend/openapi.json'); } catch (err) { app.log.error(err); process.exit(1); } }; start();Run the server to generate the OpenAPI spec
To run the script directly, execute the server using
tsx:npx tsx server.tsYour console will log the server starting up and confirm that the table was initialized, followed by writing the
openapi.jsonfile inside thebackendfolder:⏳ Initializing database tables... ✅ Database schema verified. ⚡ Fastify Server running at http://localhost:3000 📖 Swagger Docs available at http://localhost:3000/docs 📝 OpenAPI schema exported to backend/openapi.jsonNavigate to
http://localhost:3000/docsin your browser to view the generated Swagger UI showing the fully documented endpoints.You also now have a static
openapi.jsondocument in thebackendfolder that describes your API, which will be used to generate the client SDK and Zod validation schemas.Set up the React frontend with Vite
Now set up the frontend as a React application using Vite, then configure Hey API for client-side SDK generation.
Initialize the Vite app
Navigate back to the root of the project and create a new Vite React app:
cd ..
npm create vite@latest frontend -- --template react-ts
cd frontend && npm install
When prompted:
- Select "Oxlint" for "Which linter to use?"
- Select "No" for "Install with npm and start now?"
You should see output similar to:
$ npm create vite@latest frontend -- --template react-ts

> npx
> "create-vite" frontend --template react-ts

│
◇  Which linter to use?
│  Oxlint
│
◇  Install with npm and start now?
│  No
│
◇  Scaffolding project in /home/user/fastify-optitech-zod/frontend...
│
└  Done.
Install dependencies
Install the packages needed for the client SDK generation and form handling:
npm install @hey-api/client-fetch zod react-hook-form @hookform/resolvers
npm install -D @hey-api/openapi-ts typescript @types/node
Configure Hey API
Create the Hey API configuration file. This points to the
openapi.jsonproduced by Fastify and tells the generator to output the client-side Zod validation schemas:frontend/openapi-ts.config.tsimport { defineConfig } from '@hey-api/openapi-ts'; export default defineConfig({ input: '../backend/openapi.json', output: './src/client', plugins: [ '@hey-api/client-fetch', '@hey-api/sdk', { name: 'zod', types: { infer: true, }, }, ], });Generate the SDK and Zod schemas
With everything configured, run the Hey API code generator:
npx @hey-api/openapi-tsHey API will inspect the specification and output the client files in
src/client:- src/client/ ├── client.gen.ts # Configured HTTP client instance ├── sdk.gen.ts # Type-safe SDK functions (getTasks, postTasks, etc.) ├── types.gen.ts # Generated TypeScript models └── zod.gen.ts # Matching Zod validation schemasIf you inspect the auto-generated
src/client/zod.gen.tsfile, you will find Zod schemas mapping to the validation parameters defined on the backend server.Use generated schemas in client-side forms
Instead of manually duplicating schema parameters inside your frontend application, import and use the generated Zod validation schemas directly in components, form libraries (such as React Hook Form), or state validation loops.
For example, you can create a
TaskFormcomponent that uses the generatedzPostTasksBodyschema for validation:frontend/src/TaskForm.tsximport { useState } from 'react'; import { useForm } from 'react-hook-form'; import { zodResolver } from '@hookform/resolvers/zod'; import { z } from 'zod'; import { zPostTasksBody } from './client/zod.gen'; import { postTasks } from './client/sdk.gen'; type TaskFormInputs = z.infer<typeof zPostTasksBody>; type Status = { type: 'idle' | 'success' | 'error'; message: string }; export function TaskForm({ onCreated }: { onCreated?: () => void }) { const [status, setStatus] = useState<Status>({ type: 'idle', message: '' }); const { register, handleSubmit, formState: { errors, isSubmitting }, reset, } = useForm<TaskFormInputs>({ resolver: zodResolver(zPostTasksBody), }); const onSubmit = async (data: TaskFormInputs) => { setStatus({ type: 'idle', message: '' }); try { const response = await postTasks({ body: data, }); console.log('Task created successfully:', response.data); reset(); setStatus({ type: 'success', message: `Task "${response.data?.title}" created successfully!` }); onCreated?.(); } catch (error) { console.error('Failed to create task:', error); setStatus({ type: 'error', message: 'Failed to create task. Please try again.' }); } }; return ( <form onSubmit={handleSubmit(onSubmit)} style={{ marginBottom: '2rem' }}> <div style={{ marginBottom: '1rem' }}> <label>Task Title</label> <input {...register('title')} type="text" style={{ display: 'block', width: '100%', padding: '0.5rem' }} /> {errors.title && <p style={{ color: 'red' }}>{errors.title.message}</p>} </div> <div style={{ marginBottom: '1rem' }}> <label>Description</label> <textarea {...register('description')} style={{ display: 'block', width: '100%', padding: '0.5rem' }} /> </div> <button type="submit" disabled={isSubmitting} style={{ padding: '0.5rem 1rem' }}> {isSubmitting ? 'Saving...' : 'Add Task'} </button> {status.type !== 'idle' && ( <p style={{ color: status.type === 'success' ? 'green' : 'red' }} role="status"> {status.message} </p> )} </form> ); }Wire up the application entry point
Update
src/main.tsxto render theTaskFormcomponent alongside a button to fetch and display all tasks:frontend/src/main.tsximport React, { useState } from 'react'; import ReactDOM from 'react-dom/client'; import { TaskForm } from './TaskForm'; import { getTasks } from './client/sdk.gen'; import type { GetTasksResponse } from './client/types.gen'; function App() { const [tasks, setTasks] = useState<GetTasksResponse>([]); const [loading, setLoading] = useState(false); const [error, setError] = useState(''); const loadTasks = async () => { setLoading(true); setError(''); try { const response = await getTasks(); if (response.data) setTasks(response.data); } catch (err) { console.error('Failed to fetch tasks:', err); setError('Failed to fetch tasks.'); } finally { setLoading(false); } }; return ( <div style={{ padding: '2rem' }}> <h1>Tasks</h1> <button type="button" onClick={loadTasks} disabled={loading} style={{ padding: '0.5rem 1rem', marginBottom: '1rem' }}> {loading ? 'Loading...' : 'Get all tasks'} </button> <TaskForm onCreated={loadTasks} /> {error && <p style={{ color: 'red' }}>{error}</p>} <ul> {tasks.map((task) => ( <li key={task.id} style={{ marginBottom: '0.5rem' }}> <strong>{task.title}</strong> - {task.completed ? 'Done' : 'Pending'} {task.description && <p>{task.description}</p>} </li> ))} </ul> </div> ); } ReactDOM.createRoot(document.getElementById('root')!).render( <React.StrictMode> <App /> </React.StrictMode>, );The
TaskFormcomponent accepts an optionalonCreatedcallback. When a task is created successfully, the app automatically refreshes the task list. The "Get all tasks" button calls the auto-generatedgetTasks()SDK function to fetch and display all tasks from the backend.By binding your form validation directly to
zPostTasksBodygenerated from your schema, you guarantee that any change to the database constraints instantly trickles down to the UI upon code regeneration.You can now run the frontend application:
npm run devIn other terminal, ensure the backend server is running.
cd backend
npx tsx server.ts
Open your browser to
http://localhost:5173to see the application in action. You can create tasks, view them, and see that the validation rules are enforced according to the backend Zod schemas.
OptiTech uses Hey API too
The pattern you followed in this guide is the same one OptiTech uses for its own tooling. The official @optitech/sdk TypeScript client is generated from the OptiTech API's OpenAPI spec using Hey API. So if you use the OptiTech SDK in your projects, you are already using a Hey API-generated client under the hood.
OptiTech is also a sponsor of Hey API, supporting the project that makes this kind of end-to-end type safety possible.
Why this architecture matters
Implementing this automated pipeline provides critical improvements to full-stack application lifecycle:
- Single source of truth: Backend Zod definitions govern the database, API route inputs, and client inputs leaving no room for manual definition errors or stale typing.
- Immediate structural alignment: If you add, delete, or modify a field in Fastify (e.g. changing the minimum description length from optional to required), rebuilding simply involves re-spinning Fastify and regenerating the Hey API client. The frontend code will immediately reflect validation changes.
Extending this guide
In the current workflow, you define your database tables in SQL and then manually write matching Zod schemas. This works, but as your schema grows, keeping the two in sync becomes a maintenance burden and defeats the purpose of having a single source of truth. A better solution is to adopt a modern ORM that integrates seamlessly with both TypeScript and Zod, eliminating duplication and ensuring a single source of truth. For example, Drizzle ORM is a TypeScript-first ORM that supports Postgres and provides built-in Zod schema generation.
With Drizzle, you define your schema once in TypeScript using its pgTable API. The drizzle-zod package then generates Zod schemas directly from those table definitions, so your validation logic is always derived from a single source of truth. Feed these generated Zod schemas into fastify-type-provider-zod and the rest of the pipeline (OpenAPI export via Swagger, client SDK and Zod schema generation via Hey API) carries on as before. The result is an unbroken chain of type safety from the database column all the way to the frontend form, with no hand-written schemas to maintain in between.
Resources
- Fastify Type Provider Zod GitHub
- Fastify Postgres Plugin GitHub
- Hey API Documentation
- Drizzle ORM Documentation
- Drizzle Zod Integration
- OptiTech TypeScript SDK (
@optitech/sdk) - built with Hey API - Zod Official Documentation
Need help?
Join our Discord Server to ask questions or see what others are doing with OptiTech. For paid plan support options, see Support.
