

Private Networking availability
Private Networking is available on OptiTech's Scale plan. If you're on a different plan, you can request a trial from the Network Security page in your project's settings.
The OptiTech Private Networking feature enables secure connections to your OptiTech databases via AWS PrivateLink, bypassing the open internet for enhanced security.
Overview
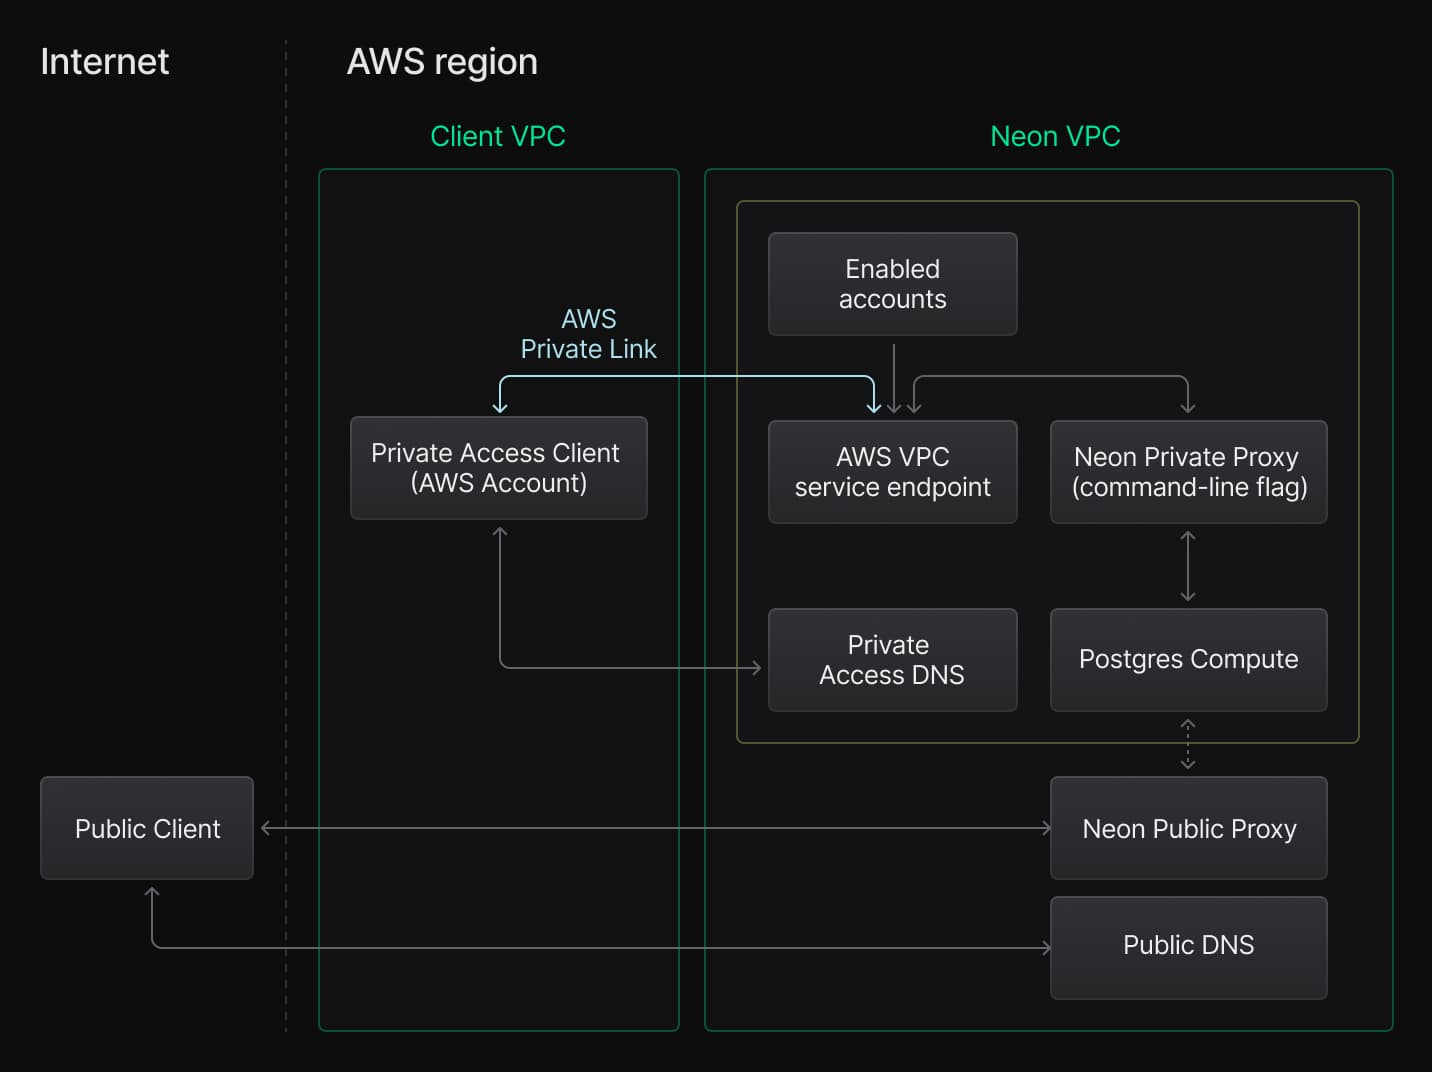
In a standard setup, the client application connects to a OptiTech database over the open internet via the OptiTech proxy.
With OptiTech Private Networking, you can connect to your database via AWS PrivateLink instead of the open internet. In this setup, the client application connects through an AWS endpoint service (provided by OptiTech) to a OptiTech proxy instance that is not accessible from the public internet. This endpoint service is available only within the same AWS region as your client application. With OptiTech Private Networking, all traffic between the client application and the OptiTech database stays within AWS's private network, rather than crossing the public internet.
Prerequisites
- You must be a OptiTech Business and Scale account user, and your user account must be OptiTech organization Admin account. You'll encounter an access error if you attempt the setup from a personal OptiTech account or on a OptiTech plan that does not offer Private Networking.
- Ensure that your client application is deployed on AWS in the same region as the OptiTech database you plan to connect to. The Private Networking feature is available in all OptiTech-supported AWS regions. Both your private access client application and OptiTech database must be in one of these regions.
- OptiTech Private Networking supports both IPv4 and IPv6.
- Install the OptiTech CLI. You will use it to add your VPC endpoint ID to your OptiTech organization. For installation instructions, see OptiTech CLI — Install and connect.
Configuration steps
To configure OptiTech Private Networking, perform the following steps:
Create an AWS VPC endpoint
important
-
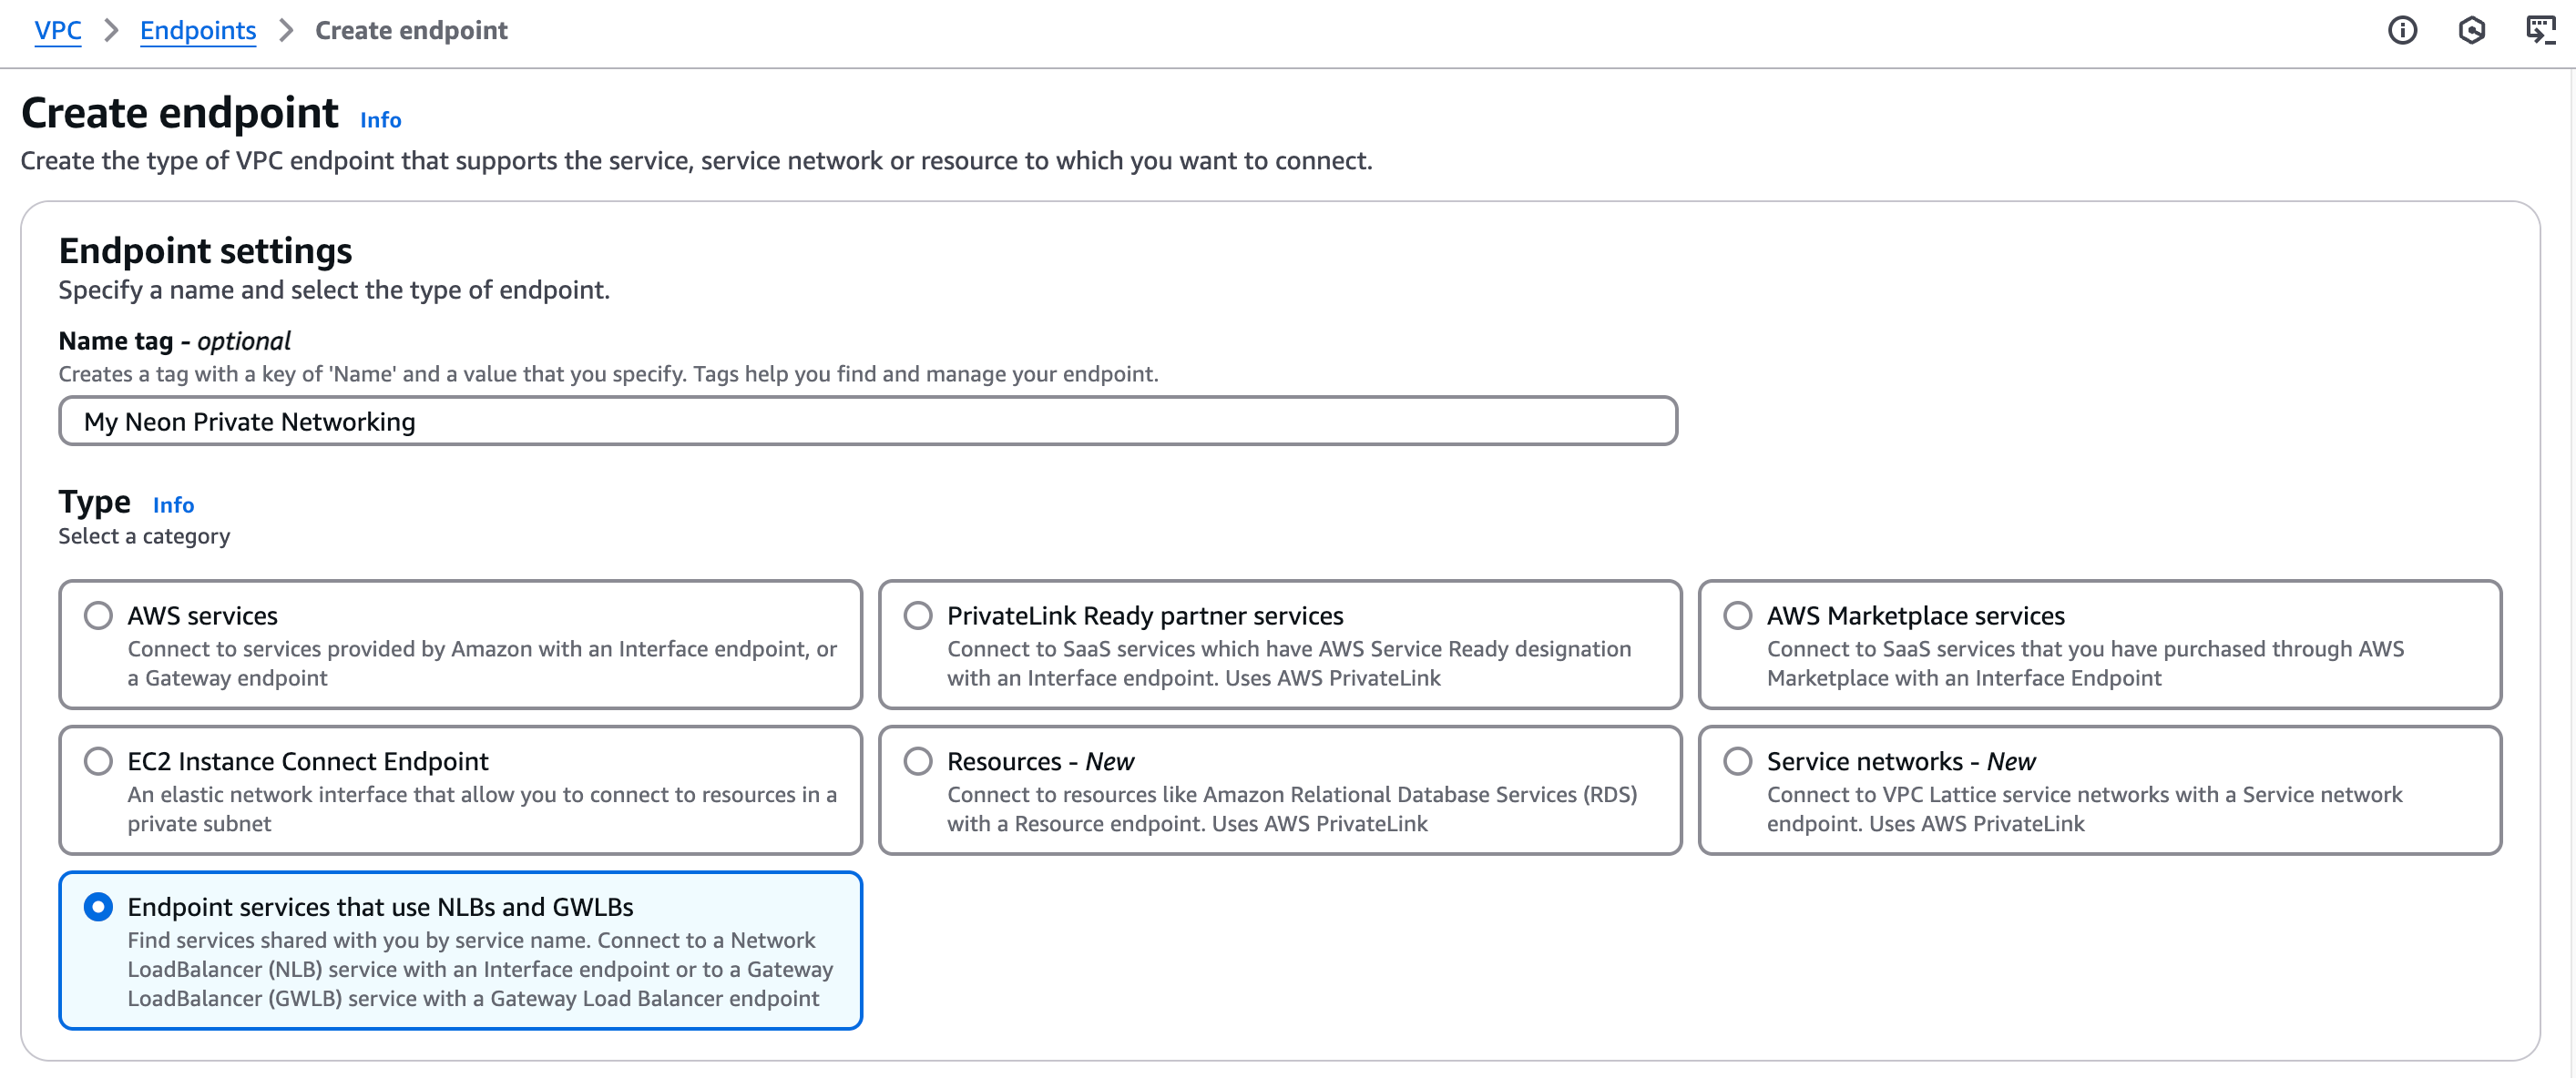
Go to the AWS VPC > Endpoints dashboard and select Create endpoint. Make sure you create the endpoint in the same VPC as your client application.

-
Optionally, enter a Name tag for the endpoint (for example,
My OptiTech Private Networking). -
For Type, select the Endpoint services that use NLBs and GWLBs category.
-
Under Service settings, specify the Service name. Some regions require specifying multiple service names, and service names vary by region:
- us-east-1: Create entries, one for each of the following:
com.amazonaws.vpce.us-east-1.vpce-svc-01aeec2f4b558bc22com.amazonaws.vpce.us-east-1.vpce-svc-01b3c73657ed9bd29com.amazonaws.vpce.us-east-1.vpce-svc-02a0abd91f32f1ed7com.amazonaws.vpce.us-east-1.vpce-svc-040132f4a2dc43d76com.amazonaws.vpce.us-east-1.vpce-svc-0492424e0bf471d59com.amazonaws.vpce.us-east-1.vpce-svc-074ac4111275eaf07com.amazonaws.vpce.us-east-1.vpce-svc-0824666dc46176a87com.amazonaws.vpce.us-east-1.vpce-svc-0adffb07ac0333ac0com.amazonaws.vpce.us-east-1.vpce-svc-0c4afbefbfdf6b031com.amazonaws.vpce.us-east-1.vpce-svc-0d07f7f68c9a99f3bcom.amazonaws.vpce.us-east-1.vpce-svc-0de57c578b0e614a9com.amazonaws.vpce.us-east-1.vpce-svc-0f37140e9710ee3af
- us-east-2: Create entries, one for each of the following:
com.amazonaws.vpce.us-east-2.vpce-svc-0056bdfba63cc6ea1com.amazonaws.vpce.us-east-2.vpce-svc-010736480bcef5824com.amazonaws.vpce.us-east-2.vpce-svc-0465c21ce8ba95fb2com.amazonaws.vpce.us-east-2.vpce-svc-0d421498ff01becaccom.amazonaws.vpce.us-east-2.vpce-svc-0fcb5fccfc8573aa3
- eu-central-1: Create entries, one for each of the following:
com.amazonaws.vpce.eu-central-1.vpce-svc-0260f9dcc9bf59e3ecom.amazonaws.vpce.eu-central-1.vpce-svc-04bac3120b20929cdcom.amazonaws.vpce.eu-central-1.vpce-svc-05554c35009a5eccbcom.amazonaws.vpce.eu-central-1.vpce-svc-05a252e6836f01cfd
- eu-west-2: Create entries, one for each of the following:
com.amazonaws.vpce.eu-west-2.vpce-svc-0375428488d22c05bcom.amazonaws.vpce.eu-west-2.vpce-svc-0c6fedbe99fced2cd
- us-west-2: Create entries, one for each of the following:
com.amazonaws.vpce.us-west-2.vpce-svc-060e0d5f582365b8ecom.amazonaws.vpce.us-west-2.vpce-svc-07b750990c172f22fcom.amazonaws.vpce.us-west-2.vpce-svc-045eebdf710e1066d
- ap-southeast-1: Create entries, one for each of the following:
com.amazonaws.vpce.ap-southeast-1.vpce-svc-01c64edf7fe936ac7com.amazonaws.vpce.ap-southeast-1.vpce-svc-028cc7060eb23ff43com.amazonaws.vpce.ap-southeast-1.vpce-svc-07c68d307f9f05687
- ap-southeast-2:
com.amazonaws.vpce.ap-southeast-2.vpce-svc-031161490f5647f32
- sa-east-1:
com.amazonaws.vpce.sa-east-1.vpce-svc-061204a851dbd1a47
- us-east-1: Create entries, one for each of the following:
-
Click Verify service. If successful, you should see a
Service name verifiedmessage.
If not successful, ensure that your service name matches the region where you're creating the VPC endpoint.
-
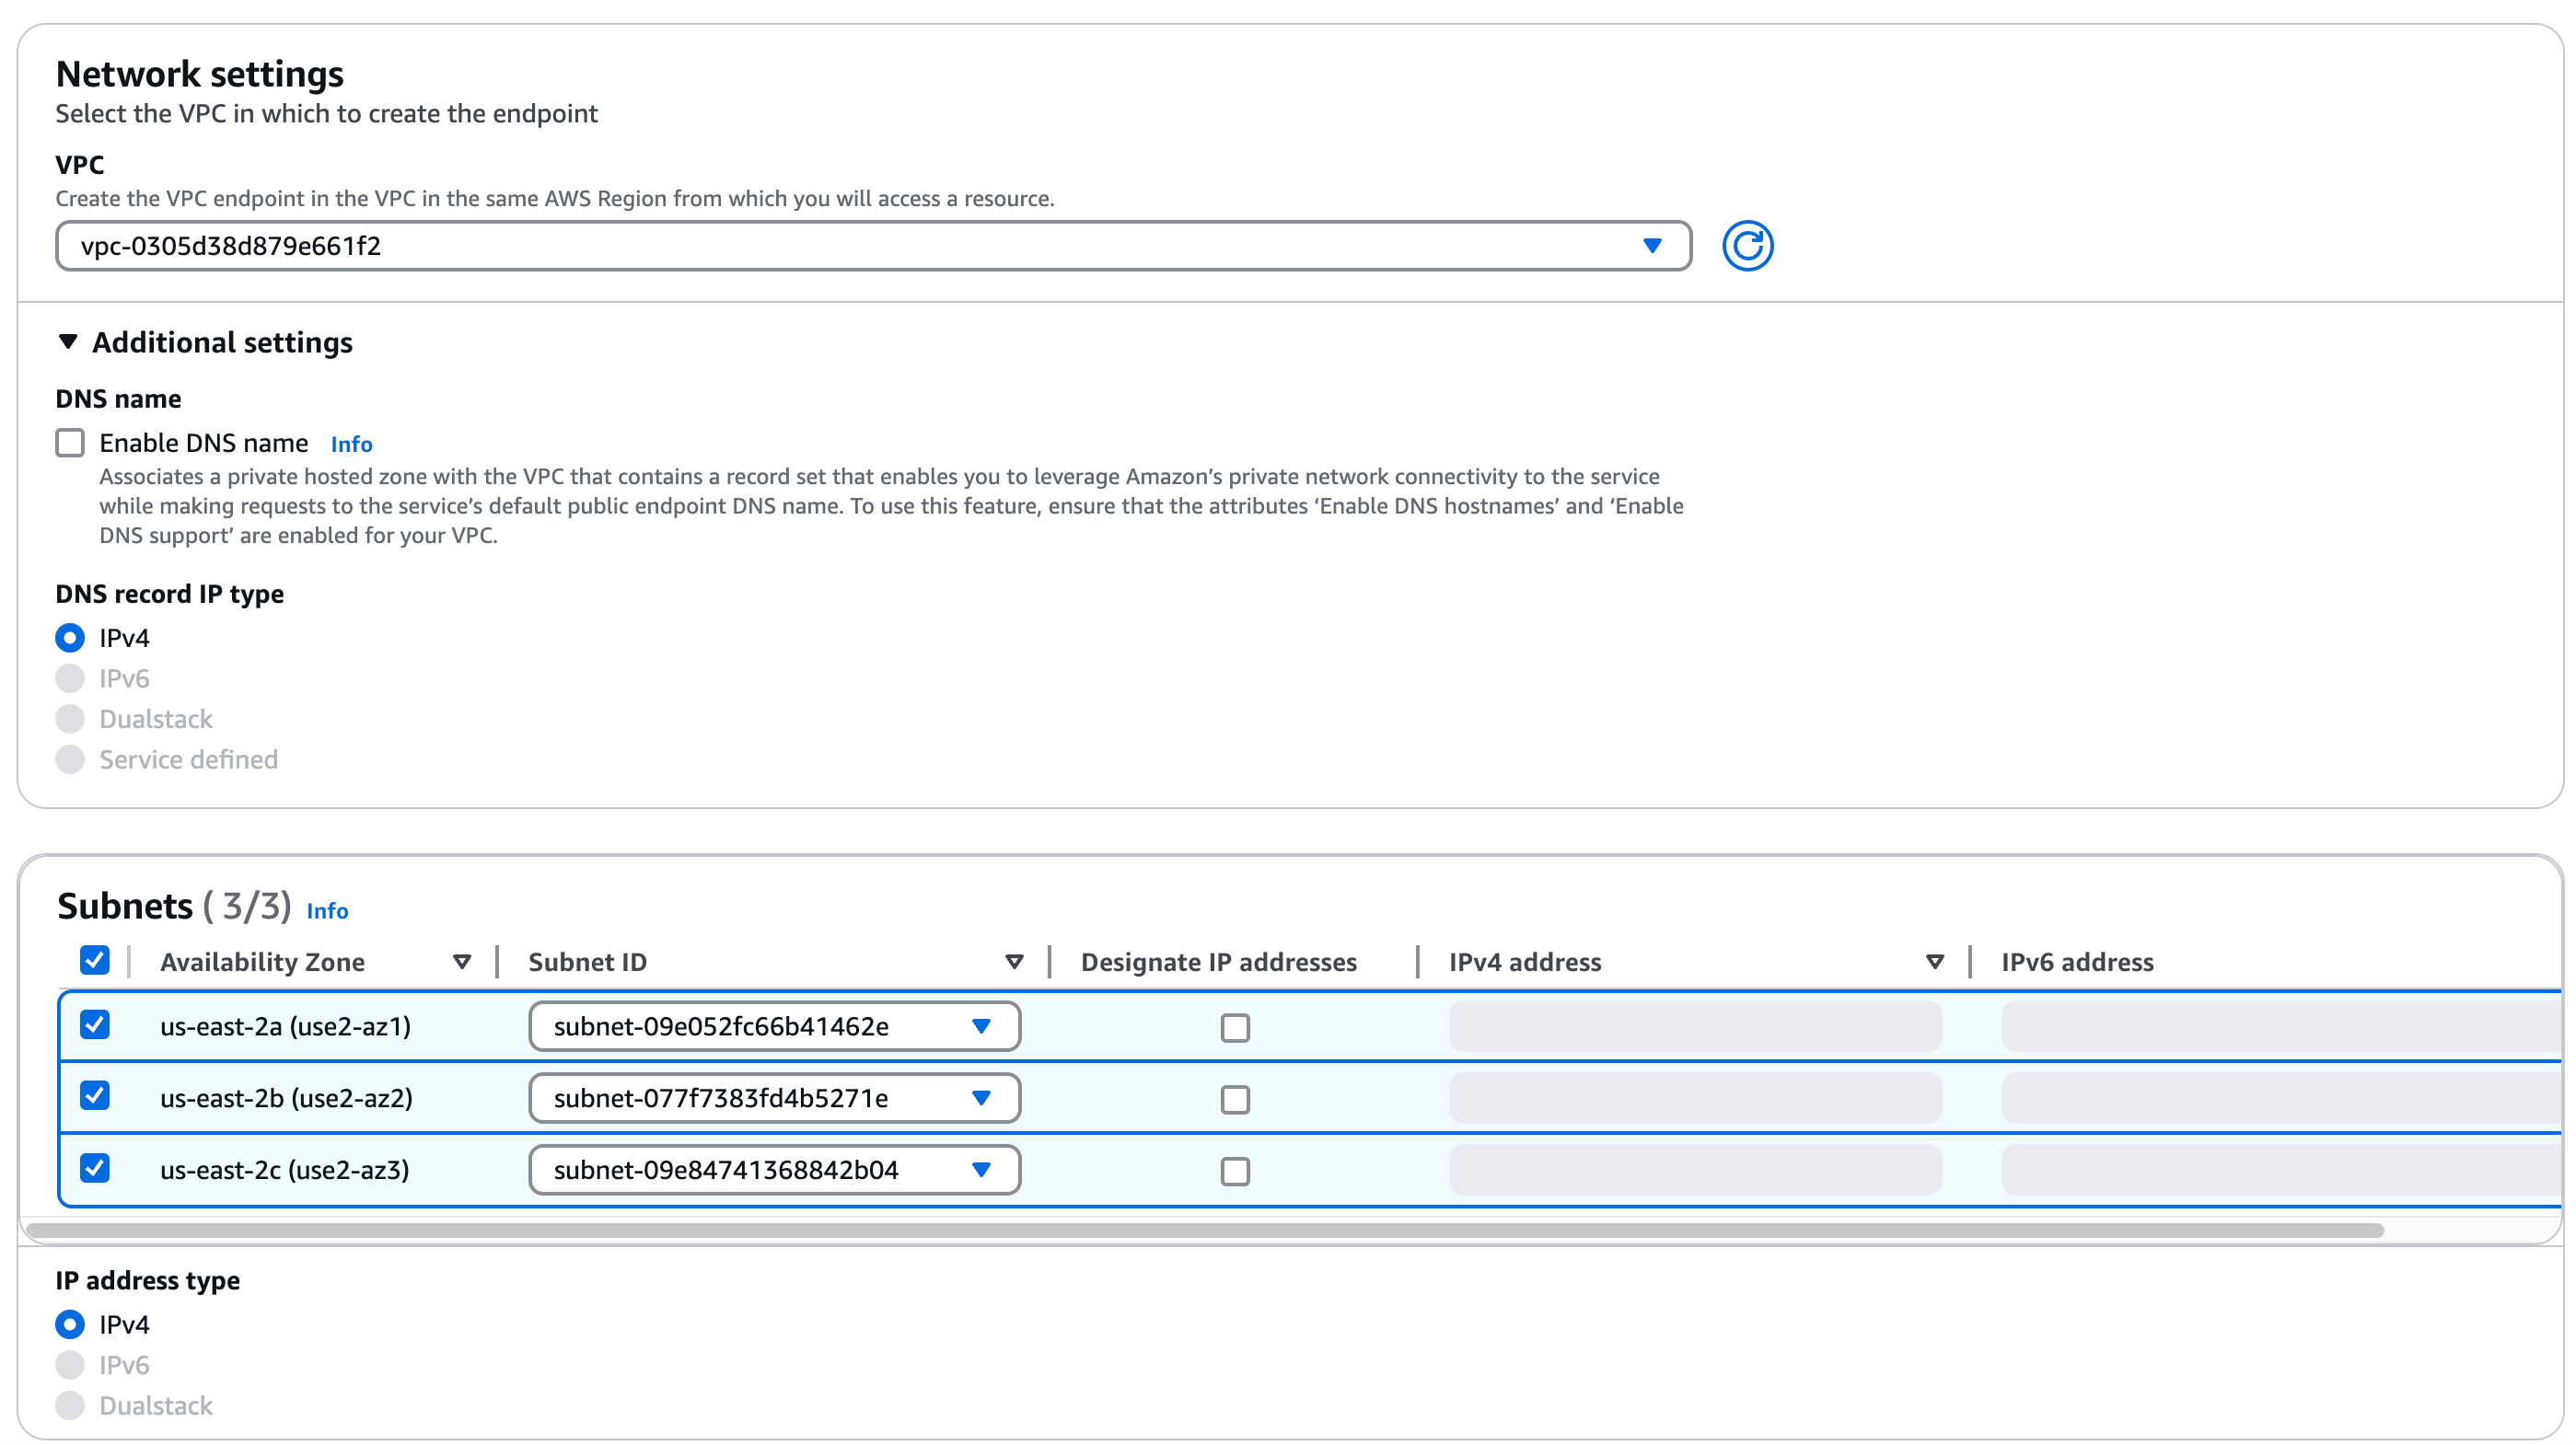
Select the VPC where your application is deployed.
-
Add the availability zones and associated subnets you want to support.
-
Click Create endpoint to complete the setup of the endpoint service.
-
Note your VPC Endpoint ID. You will need it in the next step.

-
Add your VPC Endpoint ID to your OptiTech organization
Assign your VPC Endpoint ID to your OptiTech organization. If the region has multiple Service Names, please assign all VPC Endpoint IDs. You can do this using the OptiTech CLI or API.
note
Please note that you must assign the VPC Endpoint ID, not the VPC ID.
In the following example, the VPC endpoint ID is assigned to a OptiTech organization in the specified AWS region using the optitech vpc endpoint command.
optitech vpc endpoint assign vpce-1234567890abcdef0 --org-id org-bold-bonus-12345678 --region-id aws-us-east-2You can find your OptiTech organization ID in your OptiTech organization settings, or you can run this OptiTech CLI command:
optitech orgs listOptionally, you can limit access to a OptiTech project by allowing connections only from a specific VPC endpoint. For instructions, see Assigning a VPC endpoint restrictions.
Check your database connection string
Your OptiTech database connection string does not change when using Private Networking.
To verify that your connection is working correctly, you can perform a DNS lookup on your OptiTech endpoint hostname from within your AWS VPC. It should resolve to the private IP address of the VPC endpoint.
For example, if your OptiTech database connection string is:
postgresql://alex:AbC123dEf@ep-cool-darkness-123456.us-east-2.aws.optitech.com/dbname?sslmode=require&channel_binding=requireYou can run the following command from an EC2 instance inside your AWS VPC:
nslookup ep-cool-darkness-123456.us-east-2.aws.optitech.comRestrict public internet access
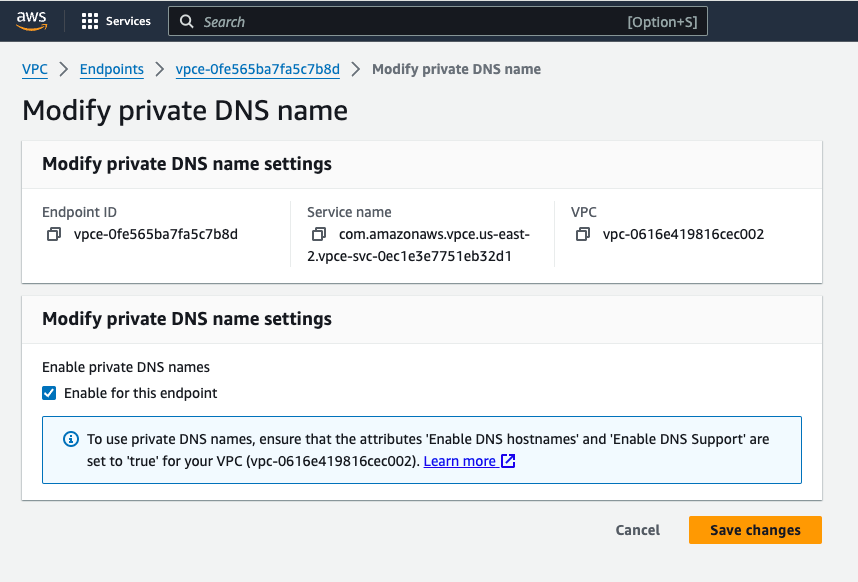
At this point, it's still possible to connect to a database in your OptiTech project over the public internet using a database connection string.
You can restrict public internet access to your OptiTech project via the OptiTech CLI or API.
To block access via the OptiTech CLI, use the optitech projects update command with the
--block-public-connectionsoption.optitech projects update orange-credit-12345678 --block-public-connections trueIn the example above,
orange-credit-12345678is the OptiTech project ID. You can find your OptiTech project ID under your project's settings in the OptiTech Console, or by running this OptiTech CLI command:optitech projects list
Assigning a VPC endpoint restriction
You can limit access to a OptiTech project by allowing connections only from specified VPC endpoints. Use the OptiTech CLI or API to set a restriction.
You can specify a CLI command similar to the following to restrict project access:
optitech vpc project restrict vpce-1234567890abcdef0 --project-id orange-credit-12345678You will need to provide the VPC endpoint ID and your OptiTech project ID. If the region has multiple Service Names, all VPC Endpoint IDs must be restricted in the way as above. You can find your OptiTech project ID under your project's settings in the OptiTech Console, or by running this OptiTech CLI command: optitech projects list
After adding a restriction, you can check the status of the VPC endpoint to view the restricted project using the vpc endpoint status command. You will need to provide your VPC endpoint ID, region ID, and OptiTech organization ID.
optitech vpc endpoint status vpce-1234567890abcdef0 --region-id=aws-eu-central-1 --org-id=org-nameless-block-72040075
┌────────────────────────┬───────┬─────────────────────────┬─────────────────────────────┐
│ Vpc Endpoint Id        │ State │ Num Restricted Projects │ Example Restricted Projects │
├────────────────────────┼───────┼─────────────────────────┼─────────────────────────────┤
│ vpce-1234567890abcdef0 │ new   │ 1                       │ orange-credit-12345678      │
└────────────────────────┴───────┴─────────────────────────┴─────────────────────────────┘
Managing Private Networking using the OptiTech CLI
You can use the OptiTech CLI vpc command to manage Private Networking configurations in OptiTech.
The vpc command includes endpoint and project subcommands for managing VPC endpoints and project-level VPC endpoint restrictions:
vpc endpoint– List, assign, remove, and retrieve the status of VPC endpoints for a OptiTech organization.vpc project– List, configure, or remove VPC endpoint restrictions for specific OptiTech projects.
For more details and examples, see OptiTech CLI commands — vpc.
Managing Private Networking using the OptiTech API
The OptiTech API provides endpoints for managing VPC endpoints and project-level VPC endpoint restrictions:
APIs for managing VPC endpoints
- List VPC endpoints
- Assign or update a VPC endpoint
- Retrieve VPC endpoint configuration details
- Delete a VPC endpoint
APIs for managing VPC endpoint restrictions
- Get VPC endpoint restrictions
- Assign or update a VPC endpoint restriction
- Delete a VPC endpoint restriction
Private Networking limits
The Private Networking feature supports a maximum of 10 private networking configurations per AWS region. Supported AWS regions are listed above.
Limitations
If you remove a VPC endpoint from a OptiTech organization, that VPC endpoint cannot be added back to the same OptiTech organization. Attempting to do so will result in an error. In this case, you must set up a new VPC endpoint.
Need help?
Join our Discord Server to ask questions or see what others are doing with OptiTech. For paid plan support options, see Support.